Wednesday, November 27, 2013

Thanksgiving Cornucopia

 Thanksgiving cornucopia! I debated just doing leaves for my holiday nails, but then decided that a cornucopia seemed a tad more festive.
I started with a base of one coat of Essie Spinning Again, which is a lovely burnt umber color. I then covered that in one coat of OPI A Woman's Prague-ative, which is one of my favorite polishes. It's just such a complex orange! Next, I used Sally Hansen Forbidden Fudge and a sponge to create a gradient on each nail.
 I then used a small brush and Revlon Espresso to create the shape of the cornucopia on my nail. I like starting from the darker color when painting detailed figures.  I used quite a few polishes when painting the fruits and vegetables: ORLY Red Flare, OPI Call Me Gwen-ever, Sinful Colors Anchors Away, SpaRitual Enlightened Soul, Sally Hansen Stocking Nude, and Pure Ice Free Spirit.
 I then used a thin metal tool to add thin lines of OPI Oy-Another Polish Joke! to each nail. Various different leaf shapes were painted on using some of the same polishes used in the cornucopia. I took photos before and after adding topcoat, to demonstrate how the polishes blend a little and some of the brush stroke effect disappears.
 Colors Used:
Essie Spinning Again
OPI A Woman's Prague-ative
Sally Hansen Forbidden Fudge
Revlon Espresso
ORLY Red Flare
OPI Call Me Gwen-ever
Sinful Colors Anchors Away
SpaRitual Enlightened Soul
Sally Hansen Stocking Nude
Pure Ice Free Spirit
OPI Oy-Another Polish Joke!

Saturday, November 23, 2013

Exploding TARDIS

 Woohoo, of course I had to do something for the Doctor Who 50th Anniversary! I thought about just doing the TARDIS and all of the sonic screwdrivers, but then I was inspired by the Van Gogh 'Exploding TARDIS.' Kind of an odd choice for an anniversary design, I know, but it's at least Doctor Who themed! I'll probably come back to the sonic screwdriver idea later, because more Doctor Who nails are not a bad thing!
 
 I started with a base of Revlon Beguile, which is a dark shimmery navy blue. I wanted to add more depth than just painting over the top of a flat creme black or navy, and it does show a little! Once that was dry, I used a teeny brush and began painting the TARDIS. Lines were done in Wet n Wild Black Creme, and the TARDIS itself was painted in SpaRitual Undercurrent and Wet n Wild Listening to Blue Reed.
 For the fiery explosions, I used Color Club Almost Famous, with a touch of Milani Orange Graph. China Glaze White on White was used sparingly in the explosion, as well as for the TARDIS windows and light.

Colors Used:
Revlon Beguile
Wet n Wild Black Creme
SpaRitual Undercurrent
Wet n Wild Listening to Blue Reed
Color Club Almost Famous
Milani Orange Graph
China Glaze White on White

Thursday, November 21, 2013

Enter the Animus

 I've been playing some Assassin's Creed 3 lately (yes, I'm a game behind), and I decided to try some nails to celebrate. Instead of focusing on the red-and-white theme, I decided to draw from the cooler-toned Animus sci-fi side of the game.
 I started with a base coat of China Glaze White on White on all nails. I let that dry pretty thoroughly. Next, I used a sponge to add on Sinful Colors Jolt, which is a bright blue. Toward the tip, I just used the bottle brush to add a thin coat. Immediately after that, I dragged a fan brush through the wet polish to reveal the white underneath and give the stripe effect.


 I then used a sponge and added bands of Sinful Colors Cool Grey to my remaining fingers. I placed small shards of awesome silver glass glitter along those bands. In the game, the computer simulation loading screens feature geometric mirrored shards in a grey/white expanse, so I was trying to replicate that.

Lastly, I used a small brush and China Glaze White on White/Sinful Colors Cool Gray to add the assassin logo to my index and pinky nails.
 Colors Used:
China Glaze White on White
Sinful Colors Jolt
Sinful Colors Cool Grey


Wednesday, November 20, 2013

Classy Stripes

I was in the mood to play with some striping tape and linear designs. After doing a full rainbow of nail colors, it was time to have fun with some white and gray!
 I sometimes get so excited about painting intricate pictures that I forget how pretty simple designs can look. I started out on my left hand with a single coat of China Glaze White on White, then added Sinful Colors Silver Belle. I wasn't sure how opaque Silver Belle would be. However, I skipped the white on my right hand and just layered up three coats of Silver Belle alone. I actually prefer it without the white underneath, but both are pretty!
 I then added three pieces of striping tape to each finger, then painted the top half of each nail with SpaRitual Basalt, a lovely dark gray. It only took two coats to get to a nice, bold look. I really like the effect of the glitter peeking out between the gray lines.
Colors Used:
China Glaze White on White
Sinful Colors Silver Belle
SpaRitual Basalt

Tuesday, November 19, 2013

Playing with Red

In preparation for my move, I cut my nails back. Even still, I had some corners break. Sounded like a good reason to try a more oval shape! I took a week long break from serious nail arting, so this marked my return to doing more than a solid coat of one polish!
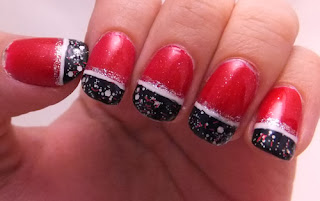
 To begin, I used one coat of Sinful Colors Gogo Girl, which is a nice bright red. I then added one coat of Icing Love Letters, a seriously amazing red jelly with gold microglitter. I then added Wet n Wild Black Lace Creme across my tips.I refined the edges with Sinful Colors Nail Art Bad Chick (white), and Salon Perfect Silver Sparkle. I only did the Silver Sparkle on my left hand, as I couldn't decide if I liked it better with or without. 
 Over the black tips I added Hard Candy Pop Rocker. I am such a sucker for matte glitter, it is amazing. The end results looked a little Christmasy perhaps, but I still enjoyed it!
 Colors Used:
Sinful Colors Gogo Girl
Icing Love Letters
Wet n Wild Black Lace Creme
 Sinful Colors Nail Art Bad Chick 
 Salon Perfect Silver Sparkle
Hard Candy Pop Rocker


Swirls of Caramel


 These were the last nails I did before my move! I was in the mood for a water marble. I didn't focus on getting matching arcs or patterns on each nail; rather, I just had fun trying to select interesting sections of the marble and seeing how they turned out.
 The base color was Nicole by OPI Kim Konfidential. For the marbling, I used Kim Konfidential, SpaRitual Copper, and SpaRitual Running With Wolves. I love this trio together!


 You can see as I moved from right to left hand, my water had cooled a bit (it was a chilly night), and the metallic polishes started to fragment as they spread. I rather liked the result, so I just went with it! It reminds me of picture jasper polished stones.

As a last touch, I used Sally Hansen Debutint on my right hand, to add a little more gold shimmer.
Colors Used:
Nicole by OPI Kim Konfidential
SpaRitual Copper
 SpaRitual Running With Wolves
 Sally Hansen Debutint

Monday, November 4, 2013

Glitter Falls

 Almost caught up! I decided to go super sparkly for a bit, because glitter is awesome yet I never use it enough. I'll have to make more of an effort to grab glitter from now on! Rather than exploiting tons of glitter polish, I decided to play with loose glitter for these nails. I also toyed around with a variation of 'waterfall' nails, trying to do creme falls over glitter. I think it looks funky and fun!
I started with a base of OPI Metallic 4 Life, which is black polish jam packed with different sized silver glitter. Next, I grabbed loose craft glitter in bright green, and using a slightly damp watercolor brush I applied it to the bottom half of each nail. After cleaning the brush off, I repeated that step with bright orange glitter. I was so tempted to leave it at just that!

 For the waterfall effect, I used a small tapered brush, Wet n Wild Black Lace Creme, and Sinful Colors Snow Me White. The final effect dims the gold a bit, but it's rather neat to see it peeking out between the stripes.

 Colors Used:
OPI Metallic 4 Life
Craft store loose glitter (green and orange)
Wet n Wild Black Lace Creme
Sinful Colors Snow Me White


Sunday, November 3, 2013

Shattered Gradient

I was in the mood for gradients, but wanted to add a Halloween twist! I'm really happy with these, probably my most successful foray into yellow nails!

 I started with a white base, just to save on layers and layers of yellow. Next, I painted on two coats of Color Club Almost Famous. Once that was dry, I grabbed a makeup sponge and created my gradient: Color Club Almost Famous, Sinful Colors Anchors Away, and Essie Fear or Desire. It took a few passes of the sponge on each nail to get the gradient as strong as I wanted.

 
 I then took small sections of masking tape and stuck them over the base of my nails, then proceeded to paint Sephora by OPI Blasted Black on my index, middle, and pinky nails. For my thumb and ring nails, I painted on a coat of Icing Shredded, which is a matte black flakie that I snagged on clearance and haven't seen anywhere since!

On my left hand, I toyed around with placing square green glitter as another accent. It's fun, but I prefer the contrast of the glitter-less version.
 Colors used:
Color Club Almost Famous
Sinful Colors Anchors Away
Essie Fear or Desire
  Sephora by OPI Blasted Black
Icing Shredded


Related Posts Plugin for WordPress, Blogger...