Wednesday, December 25, 2013

O Christmas Tree

 I had originally intended to decorate these little trees with tons of ornaments using all sorts of nail gems. However, I ended up liking it so much nice and subdued, I scrapped the gaudy ornament idea completely. Plus, this actually stood up to a busy week of holiday antics!
 I started with two coats of Sally Hansen Go Gold. I am so in love with this polish. It's one of their new Satin Glam line, and it surpassed my expectations. It actually looks more champagne than gold once it dries to that semi-matte finish.
 The trees were done by taping off a triangle using striping tape, then filling that space in with Zoya Chita, which is a lovely green textured polish. I then painted on the garland using a small brush and more textured polish, Finger Paints Midas Touch and Icing Sand Dollar. I then added silver stars with a little nail glue.

Merry Christmas!
Colors Used:
Sally Hansen Go Gold
 Zoya Chita
 Finger Paints Midas Touch
Icing Sand Dollar

Sunday, December 22, 2013

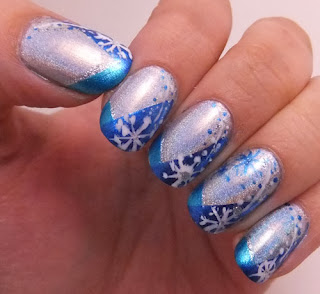
Snowflake Season

 Holographic snowflake nails! These didn't turn out all that well, but at least it was an excuse to hypnotize myself with holographic polish once again!
 I started out with Color Club Harp On It, which of course is more rainbow prism-tastic in person. It was overcast, so I couldn't even take outside pictures to get better evidence of the effect. Next, I used China Glaze So Blue Without You across my tips. I love foil polishes and the fact that they tend to be perfect one-coaters. Next, I added a large section of China Glaze Blue Bells Ring. That has to be one of my favorite blues of all time. Love!
 I then used a KISS striper to freehand some snowflakes onto my nails. Unfortunately I think my striper polish is getting a little thick for the job, and the snowflakes look a little blobby. From a distance, they're not too bad... Still, snowflakes are fun!
Colors Used:
Color Club Harp On It
 China Glaze So Blue Without You
 China Glaze Blue Bells Ring
KISS striper White

Monday, December 16, 2013

Caroling Bells

I know many people complain about Christmas music everywhere this time of the year, but I absolutely love it.  It never fails to raise my spirits. My original inspiration for these nails came from starting out listening to Carol of the Bells, followed by Christmas Bells. Obviously, my playlist shuffle dictated that bells needed to involved somewhere!

 To begin, I used two coats of Revlon Calla Lily, which is a sheer white with a gold shimmer. I knew I didn't want the extreme contrast a pure white base would bring, and it's been a while since I've played with closer to nude nail color. Once that had set, I stamped on a musical note pattern from Pueen, plate 47, using Wet n Wild Black Creme. The musical bars on this gave me a little trouble, as they didn't want to pick up and transfer as easily as some. To be fair, they are REALLY THIN lines.
 Next, I freehanded my tips in China Glaze Just Be-Claws and Sinful Colors Pine Away. I refined the edge with a KISS white nail art striper. I then added holly leaves in Revlon Emerald City. The bells were done using CQ Honey for the base color, Revlon Espresso for the details and shading, more of the KISS striper for the highlights, and OPI Oy-Another Polish Joke for the golden shimmer.
Colors Used:
Revlon Calla Lily
Wet n Wild Black Creme
 China Glaze Just Be-Claws
Sinful Colors Pine Away
KISS Nail Art White
 Revlon Emerald City
 CQ Honey
 Revlon Espresso
OPI Oy-Another Polish Joke

Thursday, December 12, 2013

Gingerbread Houses

 Decorated gingerbread houses are so cute! One of these days I'm going to break down and buy a kit to make one. It's just one of those things I never did growing up, but I figure I have to at least give it one try. Anywho! That of course doesn't stop me from decorating nails!
 I debated between going for a dark brown or a taupe base for the gingerbread itself. I decided on darker brown for added contrast, and I'm glad I did. I used a base color of Sephora by OPI Dating the Drummer. Next, I dotted in the rooftops with NYC Pinstripe White, then used smaller tools to add little details to each house. I decided to do a variety of different designs, rather than one uniform design.
 I then used China Glaze Just Be-Claws, JulieG Under Mistletoe, and OPI Oy - Another Polish Joke for additional details. It makes for an interesting effect, since some of the color doesn't pop out fully until light hits it.
Colors Used:
Sephora by OPI Dating the Drummer
 NYC Pinstripe White
 China Glaze Just Be-Claws
 JulieG Under Mistletoe
 OPI Oy - Another Polish Joke

Wednesday, December 11, 2013

Candy Canes

 Candy cane stripes! This was a fun abuse of striping tape. I was rushing it a little bit, but I think it still came out okay.
 I began with two coats of Sinful Colors Snow Me White and allowed that to dry completely. Then, I applied strips of striping tape for the design. For the red I used Sinful Colors Sugar Sugar, which is still one of my favorite red polishes. For the green I used Sinful Colors Pine Away. It's such a perfect Christmas green!
  I started out coloring the red sections with the bottle brush and using a narrower brush for the thin green stripes, but that ended up looking inconsistent. I actually had better success wiping the green bottle brush in the bottle neck to narrow it, then using that narrower profile to paint in the thin stripe.
Colors Used:
Sinful Colors Snow Me White
 Sinful Colors Sugar Sugar
 Sinful Colors Pine Away

Sunday, December 8, 2013

Presents with Fuzzy Ribbon

Tried to add a twist to wrapping paper/present nails by using some fuzzy flocking powder for the ribbons! It at least turned out...interesting? I was at least having way too much fun with stamping designs in my attempt to make everything look like wrapping paper.
 I started with Sinful Colors New Wave on my index, middle, and pinky, and China Glaze White on White on my thumb and ring fingers. I then stamped with a variety of different designs, trying to make them appear like wrapping paper. I used China Glaze Blue Bells Ring for the blue designs, and Revlon Magnetize for the silver. Blue Bells Ring is amazing for stamping! The stamps were from a variety of Pueen plates, numbers 17, 26, 32, 38, 48, and 49.
 I added a topcoat and gave the pattern designs plenty of time to dry completely. Then, I used a striping brush and some fresh polish to add lines for the ribbon. While that was still wet, I sprinkled on flocking powder in gray and blue, then brushed off the excess. As a little decorative touch, I added light blue and gold swarovski crystals with a touch of nail glue.


 Colors Used:
Sinful Colors New Wave
China Glaze White on White
China Glaze Blue Bells Ring
Revlon Magnetize

Thursday, December 5, 2013

Rudolph the Red-Nosed Reindeer

Yesterday's nails got me in a painterly mood! I decided it was time to go festive with some Rudolph nails. I probably could make this easier by using acrylic paint instead of polish, but it's a fun challenge to try to get the right colors.

 I began with two coats of ORLY Mirror Mirror. I then sponged on a loose layer of China Glaze White on White to add some snow, along with freehanding some teeny snowflakes in the sky. Next. I loosely blocked in Rudolph with Color Mates Mudd. I blended in some highlights with OPI Call me Gwen-ever, to give him that slightly ruddier tone. I used more White on White for his chest and eye, and Wet n Wild Black Creme for his eye and horn. His nose was done using Nicole by OPI Kourt is Red-i for a Pedi, along with a highlight of more Call me Gwen-ever.
 For Clarice I started with OPI A-Taupe the Space Needle, then tried to get her to the right color using Sally Hansen Stocking Nude, some Color Mates Mudd, and China Glaze White on White. Her bow was done with more Kourt is Red-i for a Pedi.

As a final touch, I decided to do a tree on my thumb. The tree itself was painted with more White on White, then garland was added with Wet n Wild Metallica and OPI Oy-Another Polish Joke (had to do silver and gold to keep with the movie, of course!). Ornaments were added using Sinful Colors Sugar Sugar and Sinful Colors Pine Away.
Colors Used:
ORLY Mirror Mirror
China Glaze White on White
  Color Mates Mudd
 OPI Call me Gwen-ever
 Wet n Wild Black Creme
Nicole by OPI Kourt is Red-i for a Pedi
 OPI A-Taupe the Space Needle
Sally Hansen Stocking Nude
 Wet n Wild Metallica
 OPI Oy-Another Polish Joke
 Sinful Colors Sugar Sugar
Sinful Colors Pine Away

Wednesday, December 4, 2013

Aquarium Fishies

 Itty bitty fishies! Garnet of The Nail Rainbow challenged me to do something based on her new little little danio fish. I decided to do an aquarium painting on my thumb, middle, and ring nails, then do a stylized representation of the fishes on my index and ring. Not the most successful nail art I've ever done, but I think it's fun!
 I started out by painting my thumb, middle, and ring fingers with a coat of SpaRitual Undercurrent. After that dried completely, I sponged a gradient onto my blue nails with some Sinful Colors Fly Away. Next, I added the aquarium sand using Sally Hansen Stocking Nude, dotted with some China Glaze White on White for some texture. I used Pure Ice Free Spirit to add some aquarium plants, and Sally Hansen Forbidden Fudge to add a log to my middle nail.

For the little fishies, I used a small brush, some Sinful Colors Island Coral, and Maybelline Pacific Blues. The blue fish is harder to see in the photos, but in person he's visible. For the fins, I used Sally Hansen Lite. I then added some little bubbles with China Glaze White on White.
 On my index and pinky I used one coat of Sally Hansen Lite, which is a thin shimmery yellow. When that was dry, I blocked off a triangle on the base of each nail, then painted my pinky with Sinful Colors Island Coral and my index with Maybelline Pacific Blues. I then added one layer of Icing Falling for You, which is a shimmery pink/gold. To add some scale effect, I used Sally Hansen Lite and stamping plate PUEEN25 with a little diamond pattern. I didn't have a good fish scale stamp, but it still works as is.

I did try with freehanding in the little yellow stripes the danios have, but it looked too busy so I reverted to just scales.
Colors Used:
SpaRitual Undercurrent
Sinful Colors Fly Away
Sally Hansen Stocking Nude
China Glaze White on White
Pure Ice Free Spirit
Sally Hansen Forbidden Fudge
Sinful Colors Island Coral
Maybelline Pacific Blues
Sally Hansen Lite
Icing Falling for You
PUEEN25

Monday, December 2, 2013

Water Spots and Holos


 My first attempt at water spotting! I'm going to have to try this again, it was a lot of fun. Then again, I like water marbling, and this isn't much different. I want to try some black over bright colors sometime, but this week I was in the mood for playing with some holographic polish. Now I just have to avoid hypnotizing myself and spending all day watching my nails sparkle with rainbows!

 The base color is Zoya Dream. I love this polish. I just picked it up at the store last week, and I couldn't wait to see what it was like. It's a beautiful blue jelly with many scattered holographic flecks. I decided to pair it with a linear holo, Color Club Over The Moon. However, I couldn't bear to cover all of the original Dream, so I left my index and ring nail alone.
 Holographic polish seems to work just fine and dandy for water spotting. It's an interesting effect! However, I felt it was still lacking a little something. I added half moons in black using Wet n wild Black Lace Creme, then traced the border in a silver KISS nail art striper and added a little gem.
 And lastly, some photos with flash, to get some of that shiny shiny holographic effect!

 Colors Used:
Zoya Dream
 Color Club Over The Moon
 Wet n wild Black Lace Creme
KISS Nail Art Silver

Related Posts Plugin for WordPress, Blogger...