Saturday, April 12, 2014

Day 11: Dots!

 Quick and easy dots this time around, because it was just time to take a fun day. Whee!
 I love this blue. It's so vivid and shiny, and if I had to point at a color on a chart, this would probably be what I would point to as 'the perfect blue.' SpaRitual Navigate is my new best friend.
 Of course, I did have to stop loving just the solid polish swatch and actually do some nail art for today. I started with OPI Blue Chips, which is a gorgeous blue jelly packed with holographic sparkle. I snagged this at TJ Maxx, and I can't find anything online about this polish! I think it may be an unreleased polish. It's really pretty - reminds me of a slightly lighter, slightly less intense Zoya Dream. I'll just have to swatch it soon!

Anywho, back to the design. I dotted on Blue Chips in a diamond of four points at the tip of each nail, then added three dots of ORLY White Tips to either side. On my ring nail I followed this pattern up to cover the nail.
Colors Used:
SpaRitual Navigate
OPI Blue Chips
ORLY White Tips

Friday, April 11, 2014

Day 10: Rainbow Gradient

 This didn't turn out exactly as I intended, but it still works for the gradient theme. And I'm still on track! I was behind in posting it, but I had these nails done right on schedule.
 I began with Zoya Indigo, which is such a dark navy that it appears black in these photos. I thought about doing this over white, but I figured I just had rainbow-over-white yesterday so I should probably try something different.
 Next, I tried my first ever multicolor stamping experiment! I used Sinful Colors Purple Heart, ORLY Sweet Peacock, Sinful Colors Pine Away, and ORLY What's the Password in horizontal stripes across a design from Pueen plate 42. I think it worked beautifully! The design transferred well, and all of the foil finish polishes showed up. It sort of looks like an insane multichrome effect!
Colors Used:
Zoya Indigo
 Sinful Colors Purple Heart
ORLY Sweet Peacock
 Sinful Colors Pine Away
ORLY What's the Password
Pueen Plate 42

Wednesday, April 9, 2014

Day 9: Rainbow Swirls

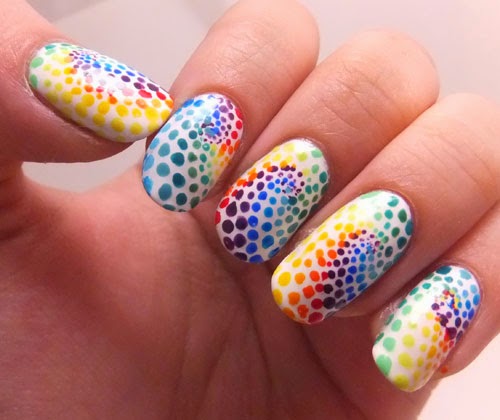
 Rainbow swirly crazy nails! I used a ridiculous number of polish colors for this design, but it was so fun! I was a little worried that the swirl pattern wouldn't work out, but in the end it's still apparent! On my right hand I just did one rainbow curled line, and loved the effect just as much!
 I started with a base of OPI Alpine Snow. For my left hand, I began with SpaRitual Shoot for the Stars (purple) and created a swirl at varied points on each nail. I used a toothpick at the center of the swirl, then increased the size of the dots using a dotting tool toward the edge of the nail. I then repeated that with the remaining fifteen colors (listed at bottom of post) until each nail was filled.
 For my right hand, I just followed the same rainbow pattern, but only in the one line. I like how nice and simple yet still fun it looks!

 Colors Used:
OPI Alpine Snow 
SpaRitual Shoot for the Stars (Warm purple)
ORLY Charged Up (Cool purple)
Ulta Whatever Floats Your Moat (Dark blue)
Finger Paints Inkblot Blue (Mid Blue)
Wet n Wild Teal Slowly and See (Light Blue)
Sinful Colors Sweet Nothing (Light Teal)
Sally Hansen New Wave Blue (Dark Teal)
Sinful Colors Strapped (Dark Green)
China Glaze Four Leaf Clover (Mid Green)
Color Club Twiggie (Light Green)
Sinful Colors High Strung (Yellow Green)
Sally Hansen Mellow Yellow (Yellow)
Spoiled Designated Driver (Macaroni Yellow)
Sinful Colors Anchors Away (Yellow Orange)
Essie Fear or Desire (Orange)
Wet n Wild Red Red (Red)


Tuesday, April 8, 2014

Day 8: Mirror Reflection

 This theme was the perfect chance to play with the super-chrome fun that is OPI Push and Shove! The one downside was that it showed where one nail was undergoing a tea bag repair, so I improvised with adding some holographic nail foil to obscure that!
 I started by using the included basecoat with the set, then added two coats of OPI Push and Shove. I then spent the next hour or so having too much fun admiring how reflective it was! I then added the holographic foil to my ring and thumb nails and spent way too much time watching it shift and shimmer.
 Because there's never enough sparkle in the world, I then added a little Sephora by OPI Beam Me Up, Hottie! as it is nearly as bright as the foil.
 Bonus shot of glitter and foil and shiny shiny nails!
Colors Used:
OPI Push and Shove
 Sephora by OPI Beam Me Up, Hottie!

Monday, April 7, 2014

Day 7: Black and White

 I might have gone a tad bit overboard with this prompt, but I was in the mood to play around with different designs! It turned into a medley of different finishes and textures, and stood up rather well through a full day of work!
 I am trying to spread the love to some more of my lesser-used polish, so I started with two coats of Ciaté Chalkboard Paint, a lovely black matte polish. Next, I attempted a criss cross pattern on my thumb and middle finger. I used Milani White Canvas, which is a striper polish, to lay down parallel white lines. I then crossed that with Milani Black Sketch, another nail art striper.  To add another contrast to the mixI used a striper brush and China Glaze Bump in the Night to give the black stripes a lovely texture.
 For my index and pinkie fingers, I first put down two crossing lines of Milani Blank Canvas, then added two stripes of Milani Black Sketch directly above them. Once that was dry, I added a light coat of Salon Perfect Touchy Feely, which is a black and white matte microglitter.

I went a little crazy on my ring finger. I used some black and silver caviar beads from a kit I snagged at Icing, and placed silver beads in rows on my nail. I then placed black beads in a crossing pattern in between the silver rows, but the topcoat obscured that effect a little. Considering how much was on that nail, I was surprised that it didn't feel heavy or bulky all day!
Colors Used:
Ciaté Chalkboard Paint
Milani White Canvas
Milani Black Sketch
China Glaze Bump in the Night
Salon Perfect Touchy Feely

Sunday, April 6, 2014

Day 6: Purple Posies

 I have been wanting to play with this idea ever since I saw that the spring polish 'trend' was for super sheer jellies. I found really cute shaped hole punches that were a good size for nail art, so the little flowers are actually regular white paper from my sketchbook!
 I thought about layering up with jelly alone, but these jellies are just too thin. So I started with two coats of Ulta Devious, a deep plum purple. Next, I used the hole punch on my white sketchbook paper to get six flower shapes. I thought about using thinner printer paper, but I was afraid that the colors would bleed through. After placing one shape, I added two coats of OPI Don't Violet Me Down, one of the new sheer tints. I followed that with another flower, and another coat of the sheer purple. The last flower I left white. I really like the gradient effect, and I think it's more apparent in person than these photos show.
 For my remaining nails, I added SpaRitual Opaline Luminary. I love flakie topcoats, and this one is a very nice purple-gold duochrome. It is a matte flakie, but I did add a topcoat this time. It's gorgeous and shimmery either way!
Colors Used:
Ulta Devious
 OPI Don't Violet Me Down
SpaRitual Opaline Luminary

Saturday, April 5, 2014

Day 5: Blue Flowers

 I have way too many blue polishes to choose from! I decided to let a random number generator choose for me, and it picked a lovely soft blue that just so happened to perfectly match a scrub top I had. So of course I had to try to replicate the pattern!
 The base polish is a recent acquisition, Sinful Colors Violets Are Blue. I was a little worried at the first coat as it started really sheer, but was fortunately fully opaque in only three coats.
 I then started haphazardly doodling the flowers in white acrylic paint, and afterward adding some light purple petals in Color Club Sweet Pea. I thought it turned out rather cute!
Colors Used:
Sinful Colors Violets Are Blue
 Color Club Sweet Pea
White Acrylic Paint

Friday, April 4, 2014

Day 4: Green Chevrons

 Eep, I was distracted by video games this evening and almost forgot to post today's nails! I realized today that not only do I not have a stamp design of simple chevrons, but I also am not all that great at freehanding them. Oh well, at a distance it doesn't look bad!
Sephora by OPI It's Totally Karma has to be one of my favorite greens. It's just so bright and fun!
The white stripes were added using a small brush and white acrylic paint. I only did the tips of most of my nails because I was afraid of messing up, but I am actually glad I left it at that! It's different, but I like it.
Not much more to say about these! I'll have to practice on chevrons some more. Either that, or I'll cave and snag some nail vinyls. Whee!
Colors Used:
Sephora by OPI It's Totally Karma
White Acrylic Paint

Thursday, April 3, 2014

Day 3: Yellow Zebra

 Yellow was a good color for this dark and dreary day. I was a little stumped for what to do for a design, but I thought zebra print could be fun!
 I started with Revlon Electric, which is a great slightly shimmery yellow creme. It's a little streaky, but opaque in two coats, which is pretty good for a bright yellow. I then added white spaces using OPI Alpine Snow.The zebra stripes were added with a matte black from the Revlon Chalkboard Nails duo. I then outlined the shapes with a KISS Silver striper polish.
  As a last touch, I added Nicole by OPI Lemon Lolly on top of the yellow creme. It's got a wonderfully subtle multicolor shimmer. Plus, it's got a lovely soft texture!
Colors Used:
Revlon Electric
OPI Alpine Snow
Revlon Chalkboard Matte Black
KISS Silver 
Nicole by OPI Lemon Lolly

Wednesday, April 2, 2014

Day 2: Sparkling Orange

 Orange really didn't want to work for me this time. I tried a dotted design but it ended up not turning out how I wanted, so I scrapped that and thought I'd try stamping. However, I wasn't overly fond of that result either, so finally I ended up at glitter. This was so sparkly in person! Sparkly hypnotizing goodness makes up for everything.
 I started with a base of China Glaze Life Preserver, then added one coat of ORLY Revere. Once that was dry, I placed diamond shaped glequins in sort of a waterfall pattern across each nail.
 I might start doing more glitter placement nails after this! I need more practice, but this went quicker than my efforts in the past and was pretty fun to do.
Colors Used:
China Glaze Life Preserver
ORLY Revere

Tuesday, April 1, 2014

Day 1: Red as a Rose

 Starting Day 1 of another 31 Day Challenge, this time with my awesome friends at Nail Polish Queens. Woohoo! Just as I was itching to do another 31 Day, too! Today's theme of course is red. I don't wear a lot of red nail polish, I guess because I always lean toward blues. I was at a bit of a loss as to what I wanted to do, then I found this cute pattern and had to try to recreate it:
I started with L'Oreal Devil Wears Red on my index and pinkie fingers, and OPI Alpine Snow on my thumb, middle, and ring nails. Next, I took a dotting tool and started randomly adding circular blobs in Revlon Raisin Rage (dark berry red creme), ORLY Revere (yellow-orange), and Sephora by OPI High Maintenance (bright red).
Next, I used a thin brush to add thin white lines inside every rose. Up close it looks a little chaotic, but I love the effect at a distance! I also painted a rose in white on my index and pinkie finger, then added a few touches of Raisin Rage and Revere to give those nails a bit more color.
 And at the very last, I added little metal 'nailhead' studs to each finger. These were actually craft supplies from a craft store, but I love how they're the perfect size and this lovely rose-gold not-quite-copper color.
Colors Used:
L'Oreal Devil Wears Red
 OPI Alpine Snow
 Revlon Raisin Rage
ORLY Revere
Sephora by OPI High Maintenance
Related Posts Plugin for WordPress, Blogger...