Showing posts with label studs. Show all posts

Sunday, September 23, 2018

Leopard Spots


Handpainted leopard spots and a leopard face. I rather love how this turned out!

Supplies:
OPI Alpine Snow
China Glaze Gold Fusion
Black Acrylic Paint
Black striping tape
Foil gel and gold foil
Gold studs

Sunday, May 10, 2015

Day 30: Challenge Day - Simple Design

 For the last day of our month of nail art, my friend challenged me to do something simple. So I decided to take a multichrome polish since I already have trouble covering up the lovely shifting hues, and just add a tiny accent.
 I used a single coat of the amazing Dance Legend Knight over China Glaze Liquid Leather. I love this copper-to-pewter multichrome so much, it's magic!
 As a tiny little accent, I added a metal square to my middle two nails and put a square nail gem in the center. Not much, just something for a little extra punch.
Colors Used:
Dance Legend Knight
 China Glaze Liquid Leather

Wednesday, April 1, 2015

Day 1: Pastel

 Starting another 30 Day Challenge, because I'm crazy like that! The first theme of the month is Pastel, which is fun because I don't normally find myself grabbing pastels. For this design I did a skittle-ruffian with what ended up looking like a pastel galaxy effect.
 I began by laying down the plain pastel cremes. Starting at my thumb, the colors are as follows: China Glaze Lotus Begin, Butter London Jasper, Finger Paints Dream I Can Fly, Icing Watermelon, and China Glaze Grass is Lime Greener. Once that was dry, I blocked off the ruffian and painted the remainder of the nail in OPI Alpine Snow. I then used a sponge to blot on more color and tried to make it look like water color.
 I then decorated the border with a thin line of white and small flowers in white as well. At the center of each flower I added a little nail art gem in a color that corresponded to the preceding nail. Mix n' match all around! Because that clearly was not enough, I added matte white glitter from Sally Hansen Eyelet, followed by scattered holographic glitter from ORLY Shine On Crazy Diamond.
 For my dominant hand, I just had fun with the handful of pastels and glitter toppers. Yay! Semi-unrelatedly, I really can't figure out why the orangey color was named 'Watermelon.' Seems an odd choice!
 Colors Used:
China Glaze Lotus Begin
Butter London Jasper
Finger Paints Dream I Can Fly
Icing Watermelon
China Glaze Grass is Lime Greener
OPI Alpine Snow
Sally Hansen Eyelet
ORLY Shine On Crazy Diamond


Wednesday, March 11, 2015

Geometric Stamping

This time the random number generator lost track of the season, as it picked Revlon Fall Mood for me to try. Far be it for me to argue with an excuse to wear copper!
Revlon Fall Mood is a bit sheer, and as I was short on time I decided to do two coats over Sally Hansen Clay, a light reddish brown. I think it would have taken many, many coats of Fall Mood alone to cover up visible nail line.
I stamped a really cool geometric design from Pueen plate 52 on my thumb, middle, and ring nails using Wet n Wild Black Creme. For my index and ring fingers, I used two rectangular studs in a line. Didn't do the greatest job aligning them, but it works.
Colors Used:
Revlon Fall Mood
Sally Hansen Clay
Pueen 52

Tuesday, March 10, 2015

Swirls on Scouse

 For a little inspiration, I asked the Random Number Generator to pick a polish for me. It fell on Butter London Scouse, a beautiful blue shimmery polish with a bright purple flash that gives it a duochrome effect.
 I really like the formula to Scouse. It's a bit thin, but three coats is enough for full coverage.It's so shimmery! I adore this shade of blue, and when you add in the purple flash it's just perfect to me.
 I didn't want to cover all of the lovely blue up, so I decided to just accent things with a stamped design and some studs. I used SpaRitual Copper and a design from Pueen plate SE01A. I love these new Pueen plates and can't wait to use them some more! The studs are actually 'nail heads' from the scrapbooking section at the craft store. I love their copper color and they're the perfect size for nail art.
Colors Used:
Butter London Scouse
SpaRitual Copper
Pueen plate SE01A

Friday, July 4, 2014

Festive Fourth!

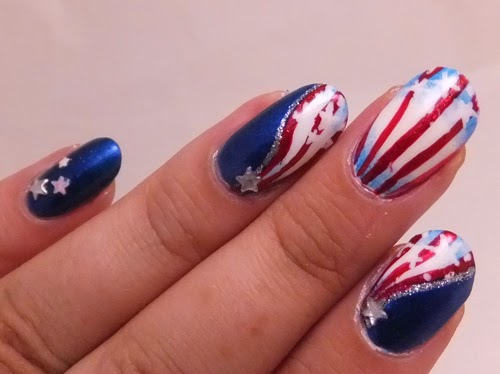
 I wanted to try something a bit different this year for the Fourth, and these...sorta kinda came out how I envisioned? Photos certainly highlight their faults, but in person I love 'em!
 I started by laying down two layers of China Glaze Eyes Like Sapphires on all nails except my middle nail. For that I used China Glaze White on White. I added a curved white section to my index and ring nails with the same white, and then let all of that dry.

I sponged on a touch of Nicole by OPI I Sea You And Raise You to the base and tips of the striped flag sections to give it a bit more depth. The red stripes were done with a striping brush and ORLY Red Flare topped with Revlon Spidey Sense for a bit more sparkle.
 Next, I used the KISS Silver nail art striper to add a little silver detail to the outside of the stripes, followed by loosely painting in various sized stars along the tips of those three nails. Because they clearly weren't bold enough, I dragged out the nails studs and glitter. I used silver studs on the outside corner of both thumb and pinkie, and plastic diamond star studs on my index and ring nails. I also used star shaped glitter on my thumb and pinkie, as they were looking lonely.

Now I'm all set for fireworks!
 Colors Used:
China Glaze Eyes Like Sapphires
China Glaze White on White
 Nicole by OPI I Sea You And Raise You
ORLY Red Flare
Revlon Spidey Sense 
KISS Silver nail art


Thursday, June 19, 2014

Crackled Ombre

 I decided to go to my spreadsheet of polish for inspiration, and utilize the first polish I had listed as still untried. That turned out to be a crackle polish! For an interesting effect, I did a horizontal ombre under it and mirrored the gradient with teardrop studs. I love it!
 The ombre was created using SpaRitual Dreams Becoming Reality on my thumb, Nicole by OPI I Sea You and Raise You on my index, Sally Hansen Blue-ming Fast on my middle, Julep Bess on my ring, and Tea Beauty Mint Leaf on my pinkie.
 The crackle polish is Sally Hansen Star Burst, a black crackle with a generous mix of silver glitter. I was a bit worried that it was going to be a bit too goopy to work, but it cracked easily once applied. I really like the effect when paired with the changing shades of blue.  As a last touch, I used three colors of teardrop studs to mirror the ombre.

Colors Used:
SpaRitual Dreams Becoming Reality
Nicole by OPI I Sea You and Raise You
Sally Hansen Blue-ming Fast
Julep Bess
Tea Beauty Mint Leaf 
Sally Hansen Star Burst

Saturday, May 31, 2014

One Stroke Iris

Finally decided to try one stroke painting! I don't think I did too badly for my first try, though I will definitely have to practice more! I tried to paint bearded iris flowers, as those are by far my favorite flower.

 I started with three coats of OPI Samoan Sand, as it's a really good nude tone on me. The iris flowers were painted with white and purple acrylic paint and a chisel-tip brush. I used a touch of yellow at the center of each 'fall' petal to represent the fuzzy beard. I thought about doing multimedia nails with flocking powder, but figured that would make it lose some of the delicacy of one-stroke.
 I touched up the tips of the flowers with a thin line of white, to make them pop a little more. Lastly, I used Zoya Hudson on my ring nail to accent. It was fortunately almost a perfect match to the purple acrylic paint! I also had fun adding some bling, because I have quite a few nail gems that I need to use!
 Even my dominant hand turned out okay!
Colors Used:
 OPI Samoan Sand
Purple, white, green, and yellow acrylic craft paint
Zoya Hudson

Wednesday, May 28, 2014

Rainbowflakes!

 Today I decided to just enjoy a polish that was begging to be tried, and I held off doing much in the way of embellishments. I love it!
 First off, I wanted to try a polish that Garnet of The Nail Rainbow had gifted me. OPI Ink is a wonderfully shifty dark purple that moves from a warm to cool purple depending on the lighting. I knew I wanted to try a dark base today, but I wanted something with a little more life than flat black. This worked amazingly well!
 The magical flakie topper is Dance Legend 603, and it is like a broken rainbow in a bottle. I only used one coat on each nail to get a huge splash of color! I have seen photos where people used more than one coat for more of a full coverage mosaic, but I was in love with the more scattered effect. These flakes shift from orange and blue all the way to green and yellow, and just look amazing.

I did decide to throw in a long diamond stud as an accent, and for a little extra fun I changed it from standard gold to a bright orange by painting it with a little ORLY What's the Password?
Colors Used:
OPI Ink
Dance Legend 603
ORLY What's the Password?

Tuesday, May 27, 2014

Magnetic Memorial

 Time to play with some magnetic polish! I wanted to have fun with more Memorial Day nails, while also experimenting with magnets. I don't have any magnetic polish I would truly call 'red', but this reddish purple did the job fairly well! It rather reminds me of those 'country style' or 'rustic' more subdued color schemes.
 I began by using a base coat of China Glaze White on White. I knew I would be using tape, so I wanted to wait until it was as dry as possible. I then placed two pieces of striping tape side by side to make the stripe wider. Next, I painted over it with two coats of Sinful Colors Captivate Me. On the second coat, I used a magnet to apply a diagonal stripe effect. It still showed up well after the tape was removed! China Glaze Sparks Will Fly was used over the bottom fourth of the nail, and I used the same magnet to add more effect. The magnet was easy to align, and using the same one did make it seem more cohesive.
 I decided to leave my middle and ring nails as one solid coat of each magnetic polish. I absolutely adore Captivate Me. It reacts amazingly well to the magnet, and has a brilliant holo glitter that really shines in the darker patches. Sparks Will Fly doesn't show the magnetic pattern as crisply, but it had a wonderful formula.

Lastly, I did my thumbs as half-and-half of each magnetic polish split by a line of white. I had some metal star brads that weren't intended for nail art, but I cut off the spines and sanded the edges, and it worked perfectly!
Colors Used:
China Glaze White on White
Sinful Colors Captivate Me
China Glaze Sparks Will Fly

Monday, May 26, 2014

Memorial Day

 Time for some Memorial Day nails! I rather like how these came together. I wanted to something patriotic without going over the top (saving that for the Fourth of July!) and I got to play with my star-shaped hole punch, fun times!
 I started with a base of Sally Hansen Resurrection, which is a mid-dusty blue. Next, I used a porous sponge to dab on some lighter blue with Essie Rock the Boat, followed by a touch of NYC Pinstripe White. It's a thinner white, so it did its job without overwhelming everything.

 The multicolored stars were a bit of a process. I can make a tutorial if anyone is interested! I started by using my star hole punch to cut a star out of a piece of regular tape. I then applied the tape firmly to the nail. Next, I used one coat of OPI Alpine Snow. That polish dries quickly, so I followed that up with stamping an angled ray design from Pueen plate 30 using ORLY Ignite. After that, I brushed SpaRitual Undercurrent across the top third of the star. It was hard to guesstimate where the star design actually was, since I was using clear tape. It didn't turn out too badly, though! I then carefully removed the tape, pulling from both sides to avoid problems with distorting the design.
As a last touch, I used a striper brush with SpaRitual Undercurrent, as well as the nail art striper polish Sinful Colors Bad Chick and Shany 07 (a bright red) to make little banner decorations at the tips of my ring, middle, and thumb nails. I then tossed on some tiny nail studs to just add a little extra shine.

Happy Memorial Day!
Colors Used:
Sally Hansen Resurrection
Essie Rock the Boat
NYC Pinstripe White
OPI Alpine Snow
ORLY Ignite
SpaRitual Undercurrent
Sinful Colors Bad Chick
Shany 07
Pueen 30

Saturday, May 17, 2014

Snow White

 Time for some Disney nails! I've been meaning to do Disney princess nails for a while, mostly because my friend challenged me to do so. Of course, I had to start chronologically, which meant tackling Snow White! I decided to do images of the evil queen and Snow White in the Magic Mirror.
 I began with Sinful Colors Black on Black on my thumb and ring nails. I then sponged OPI I Just Can't Cope-acabana onto the top half of each remaining nail. I actually rather like the effect in person, though in the photos it turned out a little darker and less dramatic.
 Next, I painted the tips of the non-character nails with Salon Perfect Baby Blues, followed by adding red details with Essie Hip-anema. I then used Sinful Colors Bad Chick (a striper) to add a thin white line to clean up the blue. Lastly, I added a little oval diamond near the base of each nail. I thought about adding more gems, but I didn't want to ruin everything by going overboard.
 For the character portraits, I used entirely too many polish colors. I just have too much fun using strictly polish for things like this, even though I could probably get a cleaner effect by using acrylic. But because this blog is mostly a way for myself to keep record of what I've done, I'm just going to list them all out.

Snow White:
Sinful Colors Black on Black (hair)
ORLY Dare to Bare (Skin)
Sally Hansen Pacific Blues (dress)
Salon Perfect Baby Blues (Sleeves)
Essie Hip-anema (Red details)
China Glaze White on White (Skin highlights, white details)

Witch:
Sinful Colors Black on Black (hood)
ORLY Dare to Bare (skin)
Seche Astute (skin shading)
China Glaze White on White (hair)
Essie Hip-anema (apple)
Essie Maximillian Strasse-her (Green glow)

 Lastly, I added green-gold detailing to the mirror frame using the awesomely duochromey Revlon 1000 Volts. Woo! I mattefied at the end mostly for the sake of avoiding glare for these photos. I did include one glossy photo at the very top, to show the increased depth of color.

 Colors Used:
Sinful Colors Black on Black
OPI I Just Can't Cope-acabana
Salon Perfect Baby Blues
Essie Hip-anema
Sinful Colors Bad Chick
ORLY Dare to Bare
Sally Hansen Pacific Blues
China Glaze White on White
Seche Astute 
Essie Maximillian Strasse-her
Revlon 1000 Volts

Related Posts Plugin for WordPress, Blogger...