Showing posts with label teal. Show all posts

Thursday, November 8, 2018

Shifting Shades

 Magnetic polish is so fun, but so hard to capture on camera. These photos didn't catch the shifting cat's eye effect, but they at least got the color shift of the multichrome! I added multichrome flakies as well for some extra fun, and then a little bit of decoration using gel paint and some dipping powder.

Supplies Used:
China Glaze Liquid Leather
F.U.N. Lacquer Believe 
Magnet
ILNP Looking Glass
Wildflowers Pop-up Gel
Mia Secret Missing You (blue powder)
ASP Electric Purple (Purple powder)

Monday, October 15, 2018

Halloween Holo Smoosh

 Prompt: Smoosh

My first attempt at a 'smoosh' technique, and for something so easy it's surprisingly fun!
I had to try some stamping over it - gotta use the halloweeny designs while I can!

Supplies:
OPI Alpine Snow
China Glaze Liquid Leather
ILNP Cityscape
ILNP Bermuda Breeze
ILNP Maiden Lane
BeautyBigBang XL-029: Cats and Ghosts
Whaline SPH-011: Cats, Bats, and Skulls

Friday, October 5, 2018

Pond


Pond Manis seem to be the new jelly sandwich from back in the day! This was a bit rushed, but the idea is still there. I had to make a custom jelly - OPI I Can Teal You Like Me from the Sheer Tints line was too light, and OPI Turquoise Aesthetic was too dark. But mixed together, they're perfect!

Supplies:
Zoya Ness (base)
Sephora by OPI Dark Room (stamp)
Dixie Plates DP 10: Lilies 
OPI I Can Teal You Like Me
OPI Turquoise Aesthetic
Acrylic Paint
GDCOCO 3D Carving Gel White

Monday, September 24, 2018

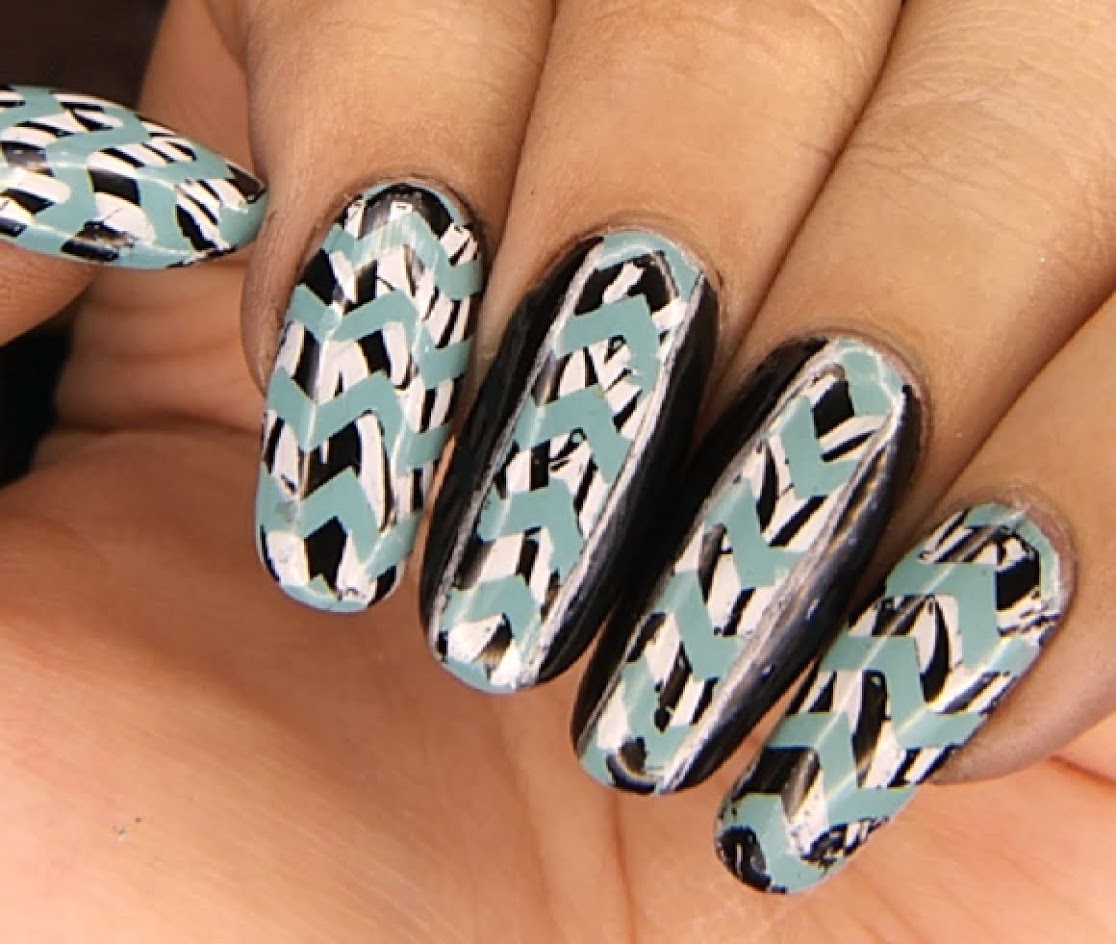
Double Processed Chevrons


Prompt: Double Processed Stamping

I really want to give this technique another go, now that I understand how it works. 

Supplies:
ORLY Gumdrop
Twinkled T Stamping Polish White
Twinkled T Stamping Polish Black
Stamping Plate BP-L 006: Zebra Stripes and Chevrons

Wednesday, April 8, 2015

Day 8: Pendant Nails

 For my jewelry inspiration I decided on a pendant I own. It's a cheap faux-abalone shell pendant with a nifty shape and diamond pattern. It seemed a fun challenge to try to recreate!
 I began by blocking out the shape with the dark teal, Sinful Colors Calypso. I was a bit sad that my negative space ovals didn't turn out perfect, but oh well. Next, I blotched on some shimmery teals with China Glaze Deviantly Daring and Essie Beach Bum Blu. A touch of Sinful Colors Bali Mist in some areas added that pink opalescent effect, but for some reason I couldn't catch it on camera.
 I took a small brush and Wet n Wild Metallica to add the silver border detail and the swoosh. Within the swoosh, I added a curving line of silver microbeads transitioning into a set of teal nail gems.

Colors Used:
Sinful Colors Calypso
China Glaze Deviantly Daring
Essie Beach Bum Blu
Sinful Colors Bali Mist 
Wet n Wild Metallica

Tuesday, April 7, 2015

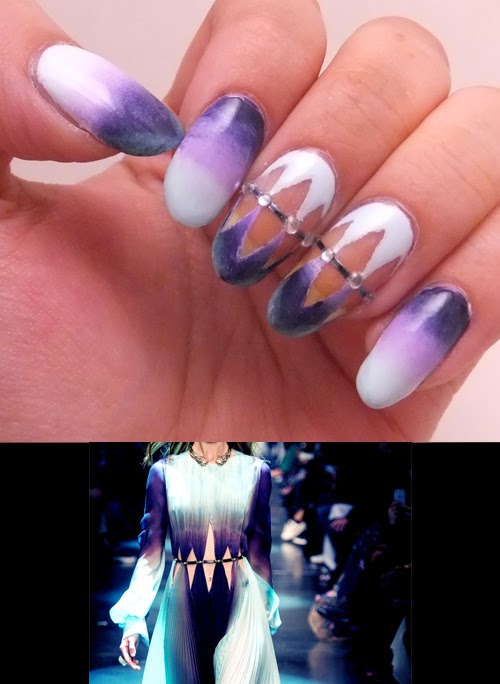
Day 7: Cavalli Dress

 For 'Fashion' theme day, I browsed the internet and found a dress I liked. Mostly, I wanted an excuse to do gradients again! It didn't turn out as well as I hoped, but oh well.
 I put a coat of China Glaze White on White down first, then sponged on a gradient of Tea Beauty Mint Leaf (light blue), Sally Hansen Lacey Lilac (Light Purple), and Sinful Colors Mesmerize (dark purple). For my middle and ring fingers, I cut out diamond shapes in scotch tape and placed them on my nails. When I pulled them up, the edges weren't the neatest due to the time it took to go from white coat to multiple layers of gradient, but it at least turned out decently!
 I added a touch of teal L'Oreal Not a Cloud in Sight to the dark purple tips. I then tried to mimic the belt using a bit of black striping tape and some small white nail gems. It isn't my favorite nail design ever, but it was fun.
Colors Used:
China Glaze White on White
Tea Beauty Mint Leaf
Sally Hansen Lacey Lilac
Sinful Colors Mesmerize
L'Oreal Not a Cloud in Sight

Sunday, April 5, 2015

Day 5: Traditional Easter Eggs

 I love the design of traditional easter eggs or 'pyansky'. I've always wanted to actually learn how to do the wax and dye designs. I figure painting nails inspired by them is the next best thing!
 I know I didn't pick the most traditional designs, but I wanted bright colors for Easter. No stamping here, these were entirely hand painted! Scroll down to see the actual eggs I based these on. Because of the detail scale quite a bit of this was done in acrylic paint.. However, I still used nail polish for the base and some details.
 For the polish colors, I used Sally Hansen New Wave Blue (thumb),  China Glaze Gaga for Green with some OPI Don't Talk Bach To Me (Index), Morgan Taylor Doo Wop (Middle), Sinful Colors Black on Black (Ring), and Sally Hansen Pacific Blue sponged with Essie Where's my Chauffer (Pinkie).

The rest of the patterns were painted with various acrylic paints. It was just too small to work with thicker polish!

Colors Used:
Sally Hansen New Wave Blue
 China Glaze Gaga for Green
 OPI Don't Talk Bach To Me
 Morgan Taylor Doo Wop
 Sinful Colors Black on Black
 Sally Hansen Pacific Blue
 Essie Where's my Chauffer

Sunday, March 22, 2015

Aztec Serpent

 I really haven't tried tribal nails before! It's a rather fun idea, and of course a great chance to use bright and bold colors. I decided to do something different and also added in an aztec double headed serpent because it looked fun. Whee!
 I began with a base of China Glaze Peachy Keen. I really rather like this color, it's like a less-pink coral. It's not a color I normally wear, but after putting it on I was really impressed! Next, I taped off a pattern on my index, middle, and ring nails. I filled in alternating triangles with Julep Lexie, which is a nice yellow.
 I then added dark teal sections to each finger using OPI Amazon...Amazoff. This is one of my favorite teals of all time. Next, the serpent was painted in a range of teals. From darkest to lightest: Sally Hansen New Wave Blue, Essie Where's My Chauffeur, and China Glaze At Vase Value. The red details were done in L'Oreal Devil Wears Red.

I used a nail art striper polish, Sinful Colors Bad Chick, to add the line details to the tribal pattern. I then had fun with my dotting tools. Dots were added in China Glaze Capacity to See Beyond, more Julep Lexie, more Devil Wears Red, and some more Peachy Keen.
Colors Used:
China Glaze Peachy Keen
Julep Lexie
OPI Amazon...Amazoff
Sally Hansen New Wave Blue
Essie Where's My Chauffeur
China Glaze At Vase Value
L'Oreal Devil Wears Red
Sinful Colors Bad Chick
China Glaze Capacity to See Beyond

Wednesday, June 25, 2014

Layered Print

 This was an interesting result of an attempt to match a complex print on one of my favorite shirts. I didn't match it perfectly, but I love the effect of all of the layered stamping! I used half a dozen different shades of teal with as many stamping designs as I thought would work together. It was fun!
 I began with two coats of Color Club Blue-ming. I then stamped on a faux-crackle pattern (Pueen 45) in the slightly lighter China Glaze At Vase Value. Next, I added a light heart-chain pattern (Pueen 27) using L'Oreal Not a Cloud In Sight. 
 A lacy ribbon stamp was next (BM-321) using Sally Hansen New Wave Blue. The stamp has a curved 'V' of lace, so I applied it in random directions on random nails. I followed that with a more tightly packed vine-floral design (BM 312) and OPI Amazon...Amazoff. I only used sections of what was on the stamper, and spread pieces throughout each nail. Next, I added a leafy design (BM-312) using Nicole by OPI Khloe Had a Little Lam-Lam. Finally, I decided to punch it up with some itty bitty flowers in Sinful Colors Black on Black.
Colors Used:
Color Club Blue-ming
China Glaze At Vase Value
L'Oreal Not a Cloud In Sight
Sally Hansen New Wave Blue
OPI Amazon...Amazoff
OPI Khloe Had a Little Lam-Lam
Sinful Colors Black on Black
Pueen 27,45
Bundle Monster 321, 312

Friday, May 23, 2014

Totally Teal

I love finding surprisingly awesome polish in places like Claire's and Icing. There are definitely some under-appreciated treasures! I've had this glitter sitting in my collection for a bit, and now that I've tried it, I'm in love!
 To begin, I used two coats of Ulta Dance Teal Dawn, which is a gorgeous dark teal with a subtle shimmer. I love this shade of teal! The downside to this polish was that it is a staining monster. I had both base coat and strengthener under this, and still I had a slight bit of staining on my nail bed. My cuticles were nightmare to clean up! Still, part of me thinks it's almost worth it for the awesome color.
 The glitter I used is Claire's Mardi Gras. The name surprised me, as I mentally picture Mardi Gras to always include purple, though that could just be me. The glitter is a mix of teal hex glitter, yellow-gold square glitter, large white hexes and bars, and a scattering of small white and teal glitters in a clear base. I love the base for this, it's just the perfect thickness to pick up a good amount of glitter. I was almost able to just swipe this glitter on with the brush, though I did dab a little to get good color spacing.

As an extra touch, I added little glittery teal studs that conveniently matched the glitter to my index and pinkie nails. I then grabbed a few squares from Mardi Gras to accent those nails. So shiny!
Colors Used:
Ulta Dance Teal Dawn
 Claire's Mardi Gras

Wednesday, April 9, 2014

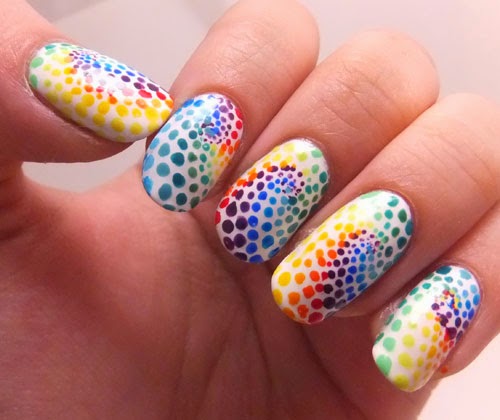
Day 9: Rainbow Swirls

 Rainbow swirly crazy nails! I used a ridiculous number of polish colors for this design, but it was so fun! I was a little worried that the swirl pattern wouldn't work out, but in the end it's still apparent! On my right hand I just did one rainbow curled line, and loved the effect just as much!
 I started with a base of OPI Alpine Snow. For my left hand, I began with SpaRitual Shoot for the Stars (purple) and created a swirl at varied points on each nail. I used a toothpick at the center of the swirl, then increased the size of the dots using a dotting tool toward the edge of the nail. I then repeated that with the remaining fifteen colors (listed at bottom of post) until each nail was filled.
 For my right hand, I just followed the same rainbow pattern, but only in the one line. I like how nice and simple yet still fun it looks!

 Colors Used:
OPI Alpine Snow 
SpaRitual Shoot for the Stars (Warm purple)
ORLY Charged Up (Cool purple)
Ulta Whatever Floats Your Moat (Dark blue)
Finger Paints Inkblot Blue (Mid Blue)
Wet n Wild Teal Slowly and See (Light Blue)
Sinful Colors Sweet Nothing (Light Teal)
Sally Hansen New Wave Blue (Dark Teal)
Sinful Colors Strapped (Dark Green)
China Glaze Four Leaf Clover (Mid Green)
Color Club Twiggie (Light Green)
Sinful Colors High Strung (Yellow Green)
Sally Hansen Mellow Yellow (Yellow)
Spoiled Designated Driver (Macaroni Yellow)
Sinful Colors Anchors Away (Yellow Orange)
Essie Fear or Desire (Orange)
Wet n Wild Red Red (Red)


Wednesday, March 26, 2014

Argyle

 Fun with argyle! I've been in a totally matte nails mode lately, haven't I? I can't help it, matte nails are just too awesome to pass up.
 I started these with a base color of ORLY Viridian Vinyl, which is already an awesome matte polish. Once that was dry, I diagrammed out where my diamonds would be for this pattern. It's not super straight, but I didn't feel like striping tape would be worth the effort in this situation. Next, I filled in the middle diamonds with ORLY White Tips. The outer diamonds were colored with a small brush and Maybelline Color Show Midnight Swim, which is a nice navy blue.
 Next, I took a toothpick and some more navy blue and added the dotted lines, with a touch of white where it crossed the navy diamonds. I was in a bit of a hurry, so these dots smeared just a smidge when I added topcoat. However, it really wasn't worth making things worse by trying to fix it, so I just let it be.
Colors Used:
ORLY Viridian Vinyl
ORLY White Tips
Maybelline Color Show Midnight Swim

Wednesday, January 8, 2014

Turquoise

 I really like how these turned out! I decided to try matching a piece of lumpy turquoise I had in my collection.
 I began with two coats of ORLY Viridian Vinyl. I really love that polish, and I love the matte quality. I was almost sad to start on the next step!
 Rather than using polish, I decided to go the lazy route and just doodle with a sharpie. I was rather pleasantly surprised that the reddish overtones on the sharpie disappeared once I added topcoat! Some of the photos were taken prior to topcoat, and the difference is surprising!

 To finish the shading, I first added highlights of NYC Cool Breeze, which is a light robin's egg blue. For a last highlight, I diluted a touch of NYC Pinstripe White in acetone and touched that to some sections.

 Colors Used:
ORLY Viridian Vinyl
 NYC Cool Breeze
 NYC Pinstripe White

Related Posts Plugin for WordPress, Blogger...