Showing posts with label rainbow. Show all posts

Saturday, April 18, 2015

Day 18: Dotticure

 Dots everywhere! This was so much fun to make, and I love the effect! It's been a bit since I've played with dotting tools, and I really should use them more often in simple designs like this.
 I began with China Glaze White on White and let that dry completely. I used a bit of striping tape to block off a diagonal section of the base of each nail. I filled in each with a different color. Starting from my thumb, I used purple Wet n Wild On A Trip, orange OPI Call Me Gwen-ever, blue Poparazzi I Want To Be Royale, green Sinful Colors Mint Tropics, and red Julep Drew.
 Next, I dotted a line of large dots in white along the colored edge, then followed with additional rows of increasingly smaller dots. The same was done with matching colors on the white side. I think it turned out fun and interesting!
Colors Used:
China Glaze White on White
Wet n Wild On A Trip
OPI Call Me Gwen-ever
Poparazzi I Want To Be Royale
Sinful Colors Mint Tropics
Julep Drew

Tuesday, April 14, 2015

Day 14: Rainbow Unicorn in Space

 I had way too much fun with this silly prompt! The idea just had so much potential! Because rainbow unicorns in space aren't flamboyant enough, I just had to also use UV reactive polish and add some glow in the dark to boot. Woo!
 I created the galaxy nails with a base of Finger Paints Queen for a Night, which is an awesome navy with small green and gold flakes. I thought it worked perfectly for a deep sky! The galaxy effect was sponged on with a combo of lavender Milani Rome, white China Glaze White on White, mint Revlon Minted, blue Sinful Colors Jolt, and shimmery orange Icing Falling for You.
The unicorn was painted with glow in the dark white Serum No 5 Pure Glow Getter. His horn and hooves glow blue with Serum No 5 Blue Blazes. I then used a small brush to paint his rainbow tail in stripes of UV reactive polish. Starting from the top, I used purple China Glaze Plur-ple, blue China Glaze DJ Blue My Mind, green Morgan Taylor Go for the Glow, yellow China Glaze Celtic Sun, orange Fing'rs Re-orange My Closet, and pink Color Club Warhol.
Indirect UV light
 Because that wasn't enough, I then added some glow in the dark powder on top of the polish. I had blue, greeen, yellow, orange, and pink, and it surprisingly enough is pretty see-through once a top coat is added. So I get the best of both worlds - UV reactive AND glow in the dark rainbows!
No light
 Colors Used:
Finger Paints Queen for a Night
Milani Rome
China Glaze White on White
Revlon Minted
Sinful Colors Jolt
Icing Falling for You
Serum No 5 Pure Glow Getter
Serum No 5 Blue Blazes
China Glaze Plur-ple
China Glaze DJ Blue My Mind
Morgan Taylor Go for the Glow
China Glaze Celtic Sun
Fing'rs Re-orange My Closet
Color Club Warhol


Saturday, April 11, 2015

Day 11: Cat Silhouettes

 The prompt for the day was 'something you own,' so I chose my trio of cool cat silhouette wall decorations. I'll get a photo of the actual inspiration up soon! Since they are just black metal silhouettes, I decided to jazz it up a little with a sparkly gradient! Bonus - it glows in the dark too!
 To save me from having to layer up jellies, I knew I was going to start with a white base. On a whim, I decided to add some shnazzy glow! I used Serum No 5 Pure Glow Getter to provide a lovely white glow. Next, I added some condensed holographic glitter to the tips - Sephora by OPI Meet Me At the Disco, followed by some China Glaze Fairy Dust. I love this sparkly combination!
To create the gradient effect, I used tinting jellies from multiple brands. My pinkie used red Julep Wendy with yellow OPI I'm Never Amberrassed. I then went from yellow to green Sally Hansen Sea Through, then to blue Sally Hansen Ice Tint. My index finger finished the transition from blue to purple Sally Hansen Grape Jelly. I decided to keep the flow of the gradient and did a horizontal gradient from purple to orange on my thumb.
  I then used a small brush and black acrylic paint to add the kitties. Two of my silhouettes are of cat faces leaning in from an angle, so I replicated those on my index and pinkie nails. The third is a straight portrait, which I split between my middle two fingers.
Colors Used:
Serum No 5 Pure Glow Getter
Sephora by OPI Meet Me At the Disco
China Glaze Fairy Dust
Julep Wendy
OPI I'm Never Amberrassed
Sally Hansen Sea Through
Sally Hansen Ice Tint
Sally Hansen Grape Jelly

Saturday, April 4, 2015

Day 4: Bunnies

Debated heavily between doing realistic or cartoony bunnies, but eventually settled on a cutesy cartoony because it makes me happy!
I decided to go with a bright shimmery blue, SpaRitual Navigate, for the background. On top of that I stamped a fun design in B.M.C. Angelic White. Once that was set, I blocked out the shape of the rabbits in a mix of acrylic paint and L'Oreal Hit the Slopes. Gotta love big goofy cartoony bunnies!
I wanted to have fun with color, so I chose a rainbow of pastel shades. Beginning with my thumb: Julep Alice (lavendar), Julep Mimi(Pink), Revlon Tropical Rain (Blue), ORLY Cheeky (melon-orange), and Revlon Minted (mint green). I used a small brush with each color to do ears and mouths. Eyes were added using Wet n Wild Black Creme. A touch of watered-down pink was just enough to give them rosy cheeks!

Colors Used:
SpaRitual Navigate
B.M.C. Angelic White
L'Oreal Hit the Slopes
 Julep Alice
Julep Mimi
Revlon Tropical Rain
ORLY Cheeky 
Revlon Minted
Wet n Wild Black Creme

Friday, March 13, 2015

Rainbow Wings

 Asked a friend for inspiration and she told me to try rainbow butterflies! This time around I decided to doodle them out and paint them by hand. I tried to make it look like an line of butterflies swirling out from my thumb, and just had fun painting!
 I really wanted these colorful butterflies to stand out, so I did them over a base of OPI Alpine Snow. After getting a general idea of where I wanted the butterflies, I painted in the gradients with a small brush. I didn't do the same style of gradient on each butterfly - some are horizontal gradients and others are radial gradients. They do all use the same colors, though!
Fuchsia: Revlon Raspberry Scone
Purple: Sephora by OPI Who's Spinning Tonight?
Blue: Color Club Chelsea Girl
Green: Essie The More the Merrier
Yellow: Morgan Taylor Doo Wop
Orange: ORLY Cheeky
Red: Essie Hip-anema
 After painting my butterfly gradients, I used a small micron pen to draw in the details on the wings. I then added small white acrylic paint dots to the edges of each wing. As a last touch, I used ORLY Mirror Mirror to add drop shadows to the butterflies.

 Colors Used:
OPI Alpine Snow
Revlon Raspberry Scone
Sephora by OPI Who's Spinning Tonight?
Color Club Chelsea Girl
Essie The More the Merrier
Morgan Taylor Doo Wop
ORLY Cheeky
Essie Hip-anema 
ORLY Mirror Mirror

Tuesday, March 10, 2015

Floral Paisley

 I'm catching up on my backlog! These nails were done for NPQ's Hippie Challenge and they were so fun to both paint and wear! I rarely wear yellow polish but this actually worked out well.
 To start I used Butter London Jasper, which is one of my favorite yellows. It's nice to find a yellow that applies so well and needs less than three coats. Once that was dry, I used nail guides to block off a half moon at the base of each nail and filled that with OPI A-Taupe the Space Needle. I decided on the moons to give some contrast to the pattern.
 The flowers were added with a small dotting tool.  I used quite a few different colors:
Sinful Colors Southern Belle (Fuchsia), China Glaze Capacity to See Beyond (Aqua blue), OPI Call Me Gwen-ever (Orange), Sinful Colors Poudre (Light orange), and Seche Delicate (Pink). A little acrylic white paint was used for the centers of most flowers.

This pattern was much easier than it appears, it just required a bit of patience. The hardest part was trying to make sure I didn't repeat the same shapes in the same orientation!
Colors Used:
Butter London Jasper
OPI A-Taupe the Space Needle
 Sinful Colors Southern Belle
 China Glaze Capacity to See Beyond
OPI Call Me Gwen-ever
 Sinful Colors Poudre
Seche Delicate

Wednesday, May 28, 2014

Rainbowflakes!

 Today I decided to just enjoy a polish that was begging to be tried, and I held off doing much in the way of embellishments. I love it!
 First off, I wanted to try a polish that Garnet of The Nail Rainbow had gifted me. OPI Ink is a wonderfully shifty dark purple that moves from a warm to cool purple depending on the lighting. I knew I wanted to try a dark base today, but I wanted something with a little more life than flat black. This worked amazingly well!
 The magical flakie topper is Dance Legend 603, and it is like a broken rainbow in a bottle. I only used one coat on each nail to get a huge splash of color! I have seen photos where people used more than one coat for more of a full coverage mosaic, but I was in love with the more scattered effect. These flakes shift from orange and blue all the way to green and yellow, and just look amazing.

I did decide to throw in a long diamond stud as an accent, and for a little extra fun I changed it from standard gold to a bright orange by painting it with a little ORLY What's the Password?
Colors Used:
OPI Ink
Dance Legend 603
ORLY What's the Password?

Thursday, May 22, 2014

Chrome Gradient

I stopped by the store this week and was so excited to see the Sally Hansen Color Foils! I love super-shiny polish, and decided I had to pick up a few. They have a formula similar to OPI Push and Shove, but don't require the extra special base coat. I decided to try something a little less controlled than I normally do, and I ended up with this interesting experiment!
 I started with two coats of ORLY Saturated, which is a super intense purple. It dries matte, and dries quickly, so it was a bit of a challenge to get even coverage.
 Next, I dabbed blobs of the Color Foil on a piece of scrap foil, then dipped my fan brush in to pick up the gradient. I found this nifty fan brush that has sections of bristles removed, so it ends up with widely spaced stripes on one stroke. Starting from the base of the nail, the three color foils I used were Sally Hansen Purple Alloy, Minted Metal, and Liquid Gold.

Even over the matte neon purple, they easily dried to that super-chromey shine. Photos really can't do it justice!
Colors Used:
ORLY Saturated
Sally Hansen Purple Alloy
Sally Hansen Minted Metal
Sally Hansen Liquid Gold

Tuesday, May 6, 2014

Pop Art

 I was feeling undecided, so I asked a friend for inspiration. She told me to do rainbow glitter nails! I instantly thought of this crazy polish from Icing.
 Icing Pop Art (or Confetti and Streamers on their website?) is a mix of large fuchsia hexes, small teal hexes, large gold, green and orange bar glitter, and teensy teal bar glitter in a clear base. For as large as the fuchsia hexes were, the curling wasn't too bad. I did have to fish a little to ensure that I got a good selection of flatter hexes, but there were plenty of uncurled glequins to go around.
 Formula was great - the new Icing bottles have a nice, wide brush and I was able to grab just the right amount of glitter on the brush. These were the result of brush stroke application, rather than fish-and-dab.
 Underneath the glitter, I used OPI Alpine Snow on my thumb and ring finger, and China Glaze What a Pansy on my index, middle, and pinkie.

Colors Used:
OPI Alpine Snow
China Glaze What A Pansy
Icing Pop Art

Friday, April 11, 2014

Day 10: Rainbow Gradient

 This didn't turn out exactly as I intended, but it still works for the gradient theme. And I'm still on track! I was behind in posting it, but I had these nails done right on schedule.
 I began with Zoya Indigo, which is such a dark navy that it appears black in these photos. I thought about doing this over white, but I figured I just had rainbow-over-white yesterday so I should probably try something different.
 Next, I tried my first ever multicolor stamping experiment! I used Sinful Colors Purple Heart, ORLY Sweet Peacock, Sinful Colors Pine Away, and ORLY What's the Password in horizontal stripes across a design from Pueen plate 42. I think it worked beautifully! The design transferred well, and all of the foil finish polishes showed up. It sort of looks like an insane multichrome effect!
Colors Used:
Zoya Indigo
 Sinful Colors Purple Heart
ORLY Sweet Peacock
 Sinful Colors Pine Away
ORLY What's the Password
Pueen Plate 42

Wednesday, April 9, 2014

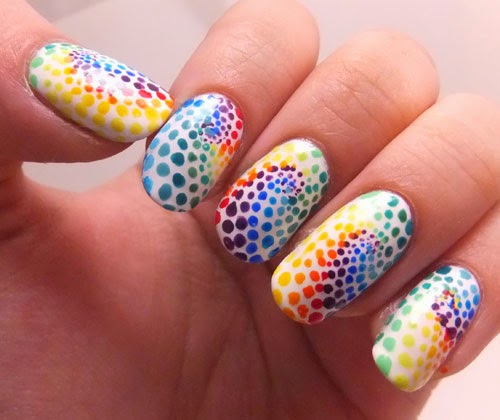
Day 9: Rainbow Swirls

 Rainbow swirly crazy nails! I used a ridiculous number of polish colors for this design, but it was so fun! I was a little worried that the swirl pattern wouldn't work out, but in the end it's still apparent! On my right hand I just did one rainbow curled line, and loved the effect just as much!
 I started with a base of OPI Alpine Snow. For my left hand, I began with SpaRitual Shoot for the Stars (purple) and created a swirl at varied points on each nail. I used a toothpick at the center of the swirl, then increased the size of the dots using a dotting tool toward the edge of the nail. I then repeated that with the remaining fifteen colors (listed at bottom of post) until each nail was filled.
 For my right hand, I just followed the same rainbow pattern, but only in the one line. I like how nice and simple yet still fun it looks!

 Colors Used:
OPI Alpine Snow 
SpaRitual Shoot for the Stars (Warm purple)
ORLY Charged Up (Cool purple)
Ulta Whatever Floats Your Moat (Dark blue)
Finger Paints Inkblot Blue (Mid Blue)
Wet n Wild Teal Slowly and See (Light Blue)
Sinful Colors Sweet Nothing (Light Teal)
Sally Hansen New Wave Blue (Dark Teal)
Sinful Colors Strapped (Dark Green)
China Glaze Four Leaf Clover (Mid Green)
Color Club Twiggie (Light Green)
Sinful Colors High Strung (Yellow Green)
Sally Hansen Mellow Yellow (Yellow)
Spoiled Designated Driver (Macaroni Yellow)
Sinful Colors Anchors Away (Yellow Orange)
Essie Fear or Desire (Orange)
Wet n Wild Red Red (Red)


Related Posts Plugin for WordPress, Blogger...