Showing posts with label red. Show all posts

Saturday, April 18, 2015

Day 18: Dotticure

 Dots everywhere! This was so much fun to make, and I love the effect! It's been a bit since I've played with dotting tools, and I really should use them more often in simple designs like this.
 I began with China Glaze White on White and let that dry completely. I used a bit of striping tape to block off a diagonal section of the base of each nail. I filled in each with a different color. Starting from my thumb, I used purple Wet n Wild On A Trip, orange OPI Call Me Gwen-ever, blue Poparazzi I Want To Be Royale, green Sinful Colors Mint Tropics, and red Julep Drew.
 Next, I dotted a line of large dots in white along the colored edge, then followed with additional rows of increasingly smaller dots. The same was done with matching colors on the white side. I think it turned out fun and interesting!
Colors Used:
China Glaze White on White
Wet n Wild On A Trip
OPI Call Me Gwen-ever
Poparazzi I Want To Be Royale
Sinful Colors Mint Tropics
Julep Drew

Monday, April 13, 2015

Day 13: Magic!

 I decided to go the nerdy route and instead of being esoteric and mystical for the 'magic' prompt, I went with mana symbols from the Magic: The Gathering card game. It's still one of my favorite games!
 I actually started this by putting down the bright base color for each symbol. Starting from my thumb: green Essence The Green & The Grunge, blue Color Club Chelsea Girl, yellow Morgan Taylor Doo Wop, red Revlon China Flower, and white China Glaze White on White.
 I then used a small brush and some black acrylic paint to draw out each design. The environments on each were done in acrylic paint as well. I debated on whether or not to match the source image and do black for the rest of the nail or try something more ambitious, but I rather like the start contrasting effect.
Colors Used:
Essence The Green & The Grunge
Color Club Chelsea Girl
Morgan Taylor Doo Wop
 Revlon China Flower
 China Glaze White on White

Sunday, March 22, 2015

Aztec Serpent

 I really haven't tried tribal nails before! It's a rather fun idea, and of course a great chance to use bright and bold colors. I decided to do something different and also added in an aztec double headed serpent because it looked fun. Whee!
 I began with a base of China Glaze Peachy Keen. I really rather like this color, it's like a less-pink coral. It's not a color I normally wear, but after putting it on I was really impressed! Next, I taped off a pattern on my index, middle, and ring nails. I filled in alternating triangles with Julep Lexie, which is a nice yellow.
 I then added dark teal sections to each finger using OPI Amazon...Amazoff. This is one of my favorite teals of all time. Next, the serpent was painted in a range of teals. From darkest to lightest: Sally Hansen New Wave Blue, Essie Where's My Chauffeur, and China Glaze At Vase Value. The red details were done in L'Oreal Devil Wears Red.

I used a nail art striper polish, Sinful Colors Bad Chick, to add the line details to the tribal pattern. I then had fun with my dotting tools. Dots were added in China Glaze Capacity to See Beyond, more Julep Lexie, more Devil Wears Red, and some more Peachy Keen.
Colors Used:
China Glaze Peachy Keen
Julep Lexie
OPI Amazon...Amazoff
Sally Hansen New Wave Blue
Essie Where's My Chauffeur
China Glaze At Vase Value
L'Oreal Devil Wears Red
Sinful Colors Bad Chick
China Glaze Capacity to See Beyond

Friday, March 20, 2015

Happy Pi Day!

 Gotta celebrate Pi Day with some Pie! Sorry for the late post, but I'm almost caught up at least! These of course were my Pi Day nails for the 14th. I'm not entirely happy with them, but maybe I'll revisit and improve on the concept next year!
 My idea was to have pies with slices taken out at different areas and then have the digits of Pi overlayed on those spots. To begin, I started with ORLY Dare to Bare. I sketched out a rough basketweave pattern for the pie crust, then filled in sectors with Sally Hansen Cinnamon. The spaces between the crust weave were filled with Essie Hip-anema to represent the cherry filling. To make it look nice and juicy, I added some shading with NYC Velvet Rope. Highlights were added with just a tiny dot of white acrylic paint.
 The numbers were painted by hand with white acrylic paint. I used small amounts of more Sally Hansen Cinnamon to give definition to the crust, and then added some Revlon Socialite to add a golden-brown shimmery color.
Colors Used:
ORLY Dare to Bare
Sally Hansen Cinnamon
Essie Hip-anema
NYC Velvet Rope
Revlon Socialite

Saturday, March 7, 2015

Swirly Hearts

 This design was originally done for the week of Valentine's. I was in the mood for something a little more minimalistic (for me at least!) and so I decided to do hearts and swirls on a gradient.
 I started out with a base layer of OPI Alpine Snow, then used a makeup sponge to apply the gradient. The darker gray shade is China Glaze Out Like A Light, and the lighter is Sinful Colors Cool Gray. 
 The hearts I freehanded with China Glaze Tip Your Hat, a lovely bright red, shaded with some ORLY Ignite, another great red creme a few shades darker. I then outlined each with a thin brush and black acrylic paint and added some swirls. I know the swirls aren't the greatest - I need to practice some more! I then added some white highlights to each heart and helped define a few swirls so that they would stand out more against the gray.
Colors Used:
OPI Alpine Snow
China Glaze Out Like A Light
Sinful Colors Cool Gray
China Glaze Tip Your Hat
ORLY Ignite

Friday, July 4, 2014

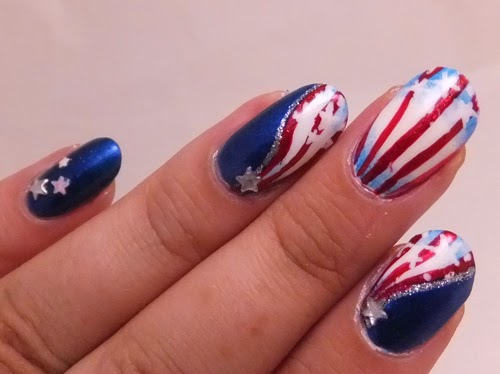
Festive Fourth!

 I wanted to try something a bit different this year for the Fourth, and these...sorta kinda came out how I envisioned? Photos certainly highlight their faults, but in person I love 'em!
 I started by laying down two layers of China Glaze Eyes Like Sapphires on all nails except my middle nail. For that I used China Glaze White on White. I added a curved white section to my index and ring nails with the same white, and then let all of that dry.

I sponged on a touch of Nicole by OPI I Sea You And Raise You to the base and tips of the striped flag sections to give it a bit more depth. The red stripes were done with a striping brush and ORLY Red Flare topped with Revlon Spidey Sense for a bit more sparkle.
 Next, I used the KISS Silver nail art striper to add a little silver detail to the outside of the stripes, followed by loosely painting in various sized stars along the tips of those three nails. Because they clearly weren't bold enough, I dragged out the nails studs and glitter. I used silver studs on the outside corner of both thumb and pinkie, and plastic diamond star studs on my index and ring nails. I also used star shaped glitter on my thumb and pinkie, as they were looking lonely.

Now I'm all set for fireworks!
 Colors Used:
China Glaze Eyes Like Sapphires
China Glaze White on White
 Nicole by OPI I Sea You And Raise You
ORLY Red Flare
Revlon Spidey Sense 
KISS Silver nail art


Tuesday, May 27, 2014

Magnetic Memorial

 Time to play with some magnetic polish! I wanted to have fun with more Memorial Day nails, while also experimenting with magnets. I don't have any magnetic polish I would truly call 'red', but this reddish purple did the job fairly well! It rather reminds me of those 'country style' or 'rustic' more subdued color schemes.
 I began by using a base coat of China Glaze White on White. I knew I would be using tape, so I wanted to wait until it was as dry as possible. I then placed two pieces of striping tape side by side to make the stripe wider. Next, I painted over it with two coats of Sinful Colors Captivate Me. On the second coat, I used a magnet to apply a diagonal stripe effect. It still showed up well after the tape was removed! China Glaze Sparks Will Fly was used over the bottom fourth of the nail, and I used the same magnet to add more effect. The magnet was easy to align, and using the same one did make it seem more cohesive.
 I decided to leave my middle and ring nails as one solid coat of each magnetic polish. I absolutely adore Captivate Me. It reacts amazingly well to the magnet, and has a brilliant holo glitter that really shines in the darker patches. Sparks Will Fly doesn't show the magnetic pattern as crisply, but it had a wonderful formula.

Lastly, I did my thumbs as half-and-half of each magnetic polish split by a line of white. I had some metal star brads that weren't intended for nail art, but I cut off the spines and sanded the edges, and it worked perfectly!
Colors Used:
China Glaze White on White
Sinful Colors Captivate Me
China Glaze Sparks Will Fly

Monday, May 26, 2014

Memorial Day

 Time for some Memorial Day nails! I rather like how these came together. I wanted to something patriotic without going over the top (saving that for the Fourth of July!) and I got to play with my star-shaped hole punch, fun times!
 I started with a base of Sally Hansen Resurrection, which is a mid-dusty blue. Next, I used a porous sponge to dab on some lighter blue with Essie Rock the Boat, followed by a touch of NYC Pinstripe White. It's a thinner white, so it did its job without overwhelming everything.

 The multicolored stars were a bit of a process. I can make a tutorial if anyone is interested! I started by using my star hole punch to cut a star out of a piece of regular tape. I then applied the tape firmly to the nail. Next, I used one coat of OPI Alpine Snow. That polish dries quickly, so I followed that up with stamping an angled ray design from Pueen plate 30 using ORLY Ignite. After that, I brushed SpaRitual Undercurrent across the top third of the star. It was hard to guesstimate where the star design actually was, since I was using clear tape. It didn't turn out too badly, though! I then carefully removed the tape, pulling from both sides to avoid problems with distorting the design.
As a last touch, I used a striper brush with SpaRitual Undercurrent, as well as the nail art striper polish Sinful Colors Bad Chick and Shany 07 (a bright red) to make little banner decorations at the tips of my ring, middle, and thumb nails. I then tossed on some tiny nail studs to just add a little extra shine.

Happy Memorial Day!
Colors Used:
Sally Hansen Resurrection
Essie Rock the Boat
NYC Pinstripe White
OPI Alpine Snow
ORLY Ignite
SpaRitual Undercurrent
Sinful Colors Bad Chick
Shany 07
Pueen 30

Wednesday, April 9, 2014

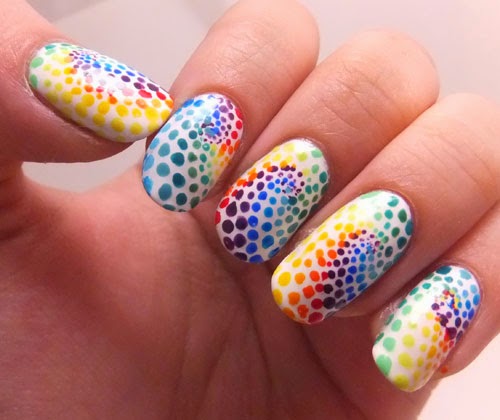
Day 9: Rainbow Swirls

 Rainbow swirly crazy nails! I used a ridiculous number of polish colors for this design, but it was so fun! I was a little worried that the swirl pattern wouldn't work out, but in the end it's still apparent! On my right hand I just did one rainbow curled line, and loved the effect just as much!
 I started with a base of OPI Alpine Snow. For my left hand, I began with SpaRitual Shoot for the Stars (purple) and created a swirl at varied points on each nail. I used a toothpick at the center of the swirl, then increased the size of the dots using a dotting tool toward the edge of the nail. I then repeated that with the remaining fifteen colors (listed at bottom of post) until each nail was filled.
 For my right hand, I just followed the same rainbow pattern, but only in the one line. I like how nice and simple yet still fun it looks!

 Colors Used:
OPI Alpine Snow 
SpaRitual Shoot for the Stars (Warm purple)
ORLY Charged Up (Cool purple)
Ulta Whatever Floats Your Moat (Dark blue)
Finger Paints Inkblot Blue (Mid Blue)
Wet n Wild Teal Slowly and See (Light Blue)
Sinful Colors Sweet Nothing (Light Teal)
Sally Hansen New Wave Blue (Dark Teal)
Sinful Colors Strapped (Dark Green)
China Glaze Four Leaf Clover (Mid Green)
Color Club Twiggie (Light Green)
Sinful Colors High Strung (Yellow Green)
Sally Hansen Mellow Yellow (Yellow)
Spoiled Designated Driver (Macaroni Yellow)
Sinful Colors Anchors Away (Yellow Orange)
Essie Fear or Desire (Orange)
Wet n Wild Red Red (Red)


Tuesday, April 1, 2014

Day 1: Red as a Rose

 Starting Day 1 of another 31 Day Challenge, this time with my awesome friends at Nail Polish Queens. Woohoo! Just as I was itching to do another 31 Day, too! Today's theme of course is red. I don't wear a lot of red nail polish, I guess because I always lean toward blues. I was at a bit of a loss as to what I wanted to do, then I found this cute pattern and had to try to recreate it:
I started with L'Oreal Devil Wears Red on my index and pinkie fingers, and OPI Alpine Snow on my thumb, middle, and ring nails. Next, I took a dotting tool and started randomly adding circular blobs in Revlon Raisin Rage (dark berry red creme), ORLY Revere (yellow-orange), and Sephora by OPI High Maintenance (bright red).
Next, I used a thin brush to add thin white lines inside every rose. Up close it looks a little chaotic, but I love the effect at a distance! I also painted a rose in white on my index and pinkie finger, then added a few touches of Raisin Rage and Revere to give those nails a bit more color.
 And at the very last, I added little metal 'nailhead' studs to each finger. These were actually craft supplies from a craft store, but I love how they're the perfect size and this lovely rose-gold not-quite-copper color.
Colors Used:
L'Oreal Devil Wears Red
 OPI Alpine Snow
 Revlon Raisin Rage
ORLY Revere
Sephora by OPI High Maintenance

Monday, December 16, 2013

Caroling Bells

I know many people complain about Christmas music everywhere this time of the year, but I absolutely love it.  It never fails to raise my spirits. My original inspiration for these nails came from starting out listening to Carol of the Bells, followed by Christmas Bells. Obviously, my playlist shuffle dictated that bells needed to involved somewhere!

 To begin, I used two coats of Revlon Calla Lily, which is a sheer white with a gold shimmer. I knew I didn't want the extreme contrast a pure white base would bring, and it's been a while since I've played with closer to nude nail color. Once that had set, I stamped on a musical note pattern from Pueen, plate 47, using Wet n Wild Black Creme. The musical bars on this gave me a little trouble, as they didn't want to pick up and transfer as easily as some. To be fair, they are REALLY THIN lines.
 Next, I freehanded my tips in China Glaze Just Be-Claws and Sinful Colors Pine Away. I refined the edge with a KISS white nail art striper. I then added holly leaves in Revlon Emerald City. The bells were done using CQ Honey for the base color, Revlon Espresso for the details and shading, more of the KISS striper for the highlights, and OPI Oy-Another Polish Joke for the golden shimmer.
Colors Used:
Revlon Calla Lily
Wet n Wild Black Creme
 China Glaze Just Be-Claws
Sinful Colors Pine Away
KISS Nail Art White
 Revlon Emerald City
 CQ Honey
 Revlon Espresso
OPI Oy-Another Polish Joke

Related Posts Plugin for WordPress, Blogger...