Showing posts with label striping tape. Show all posts

Sunday, September 23, 2018

Leopard Spots


Handpainted leopard spots and a leopard face. I rather love how this turned out!

Supplies:
OPI Alpine Snow
China Glaze Gold Fusion
Black Acrylic Paint
Black striping tape
Foil gel and gold foil
Gold studs

Sunday, May 10, 2015

Day 28: Classy Animal Print

 Sorry for the delay in getting these last designs up! I actually did finish the challenge in April, but just didn't get around to posting! For the animal print challenge I decided to do a color blocked leopard print, because leopard print is always good.
 I began with a base of OPI Baring it All, which is a nice mid-tone nude. I then used OPI A-taupe the Space Needle, more Baring it All, and Nicole by OPI Others Pale by Kim-parison to apply a gradient to each nail. I wanted a bit more brightness, so I sponged some China Glaze White on White onto the very trips of each nail. I then added one coat of Sinful Colors 24 Karat to give it all a sparkly finish.
 Once that was dry I blocked off sections with some striping tape, then filled in portions with China Glaze Liquid Leather.  I then used a dotting tool to draw in some leopard spots with more Liquid Leather. The centers of the pattern spots were colored yellow with an unnamed ORLY goldenrod yellow (FBI40037?). It's such a pretty yellow; I have no idea why it wasn't named. As a last touch I added champagne colored nail gems to my index and pinkie nails.
Colors Used:
OPI Baring it All
OPI A-taupe the Space Needle
Nicole by OPI Others Pale by Kim-parison
 China Glaze White on White
 Sinful Colors 24 Karat
China Glaze Liquid Leather
ORLY FBI40037

Tuesday, April 21, 2015

Day 21: Scaled Gradient

 I've seen multi-gradients like this around the web and always loved the effect, so I had to try it for myself. It's so fun, and definitely eye-catching!
 I began on a white base of China Glaze White on White. On three nails I decided on a green China Glaze Four Leaf Clover and yellow OPI I just Can't Cope-acabana combination. The other two were done in purple China Glaze Plur-ple and neon pink China Glaze Pool Party.
 I used a sponge to apply the first gradient to the base of each nail. Once that was completely dry, I used a chevron nail guide sticker to block off the edge. I haven't got my hands on nail vinyls yet, but I hope to get some soon! In the meanwhile, nail guide stickers seem to do the trick. I repeated twice to space the design across the nail.  Next time I'll have to do alternating colors for something different, but I do love the effect of repeating the same colors!
Colors Used:
China Glaze White on White
China Glaze Four Leaf Clover
OPI I just Can't Cope-acabana
China Glaze Plur-ple 
China Glaze Pool Party

Saturday, April 18, 2015

Day 18: Dotticure

 Dots everywhere! This was so much fun to make, and I love the effect! It's been a bit since I've played with dotting tools, and I really should use them more often in simple designs like this.
 I began with China Glaze White on White and let that dry completely. I used a bit of striping tape to block off a diagonal section of the base of each nail. I filled in each with a different color. Starting from my thumb, I used purple Wet n Wild On A Trip, orange OPI Call Me Gwen-ever, blue Poparazzi I Want To Be Royale, green Sinful Colors Mint Tropics, and red Julep Drew.
 Next, I dotted a line of large dots in white along the colored edge, then followed with additional rows of increasingly smaller dots. The same was done with matching colors on the white side. I think it turned out fun and interesting!
Colors Used:
China Glaze White on White
Wet n Wild On A Trip
OPI Call Me Gwen-ever
Poparazzi I Want To Be Royale
Sinful Colors Mint Tropics
Julep Drew

Tuesday, April 7, 2015

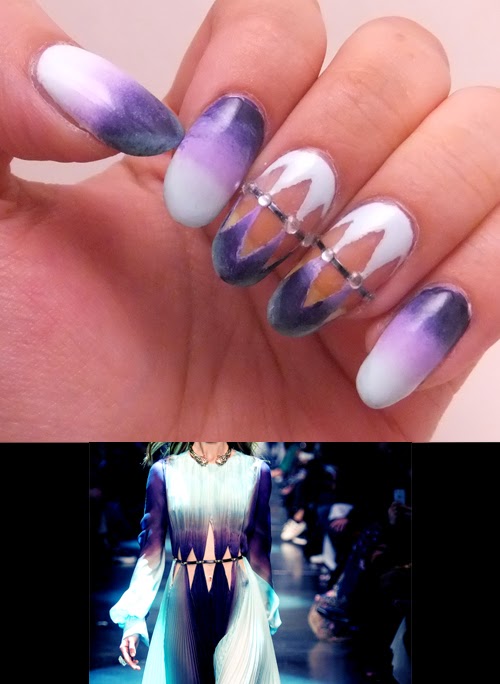
Day 7: Cavalli Dress

 For 'Fashion' theme day, I browsed the internet and found a dress I liked. Mostly, I wanted an excuse to do gradients again! It didn't turn out as well as I hoped, but oh well.
 I put a coat of China Glaze White on White down first, then sponged on a gradient of Tea Beauty Mint Leaf (light blue), Sally Hansen Lacey Lilac (Light Purple), and Sinful Colors Mesmerize (dark purple). For my middle and ring fingers, I cut out diamond shapes in scotch tape and placed them on my nails. When I pulled them up, the edges weren't the neatest due to the time it took to go from white coat to multiple layers of gradient, but it at least turned out decently!
 I added a touch of teal L'Oreal Not a Cloud in Sight to the dark purple tips. I then tried to mimic the belt using a bit of black striping tape and some small white nail gems. It isn't my favorite nail design ever, but it was fun.
Colors Used:
China Glaze White on White
Tea Beauty Mint Leaf
Sally Hansen Lacey Lilac
Sinful Colors Mesmerize
L'Oreal Not a Cloud in Sight

Sunday, March 22, 2015

Aztec Serpent

 I really haven't tried tribal nails before! It's a rather fun idea, and of course a great chance to use bright and bold colors. I decided to do something different and also added in an aztec double headed serpent because it looked fun. Whee!
 I began with a base of China Glaze Peachy Keen. I really rather like this color, it's like a less-pink coral. It's not a color I normally wear, but after putting it on I was really impressed! Next, I taped off a pattern on my index, middle, and ring nails. I filled in alternating triangles with Julep Lexie, which is a nice yellow.
 I then added dark teal sections to each finger using OPI Amazon...Amazoff. This is one of my favorite teals of all time. Next, the serpent was painted in a range of teals. From darkest to lightest: Sally Hansen New Wave Blue, Essie Where's My Chauffeur, and China Glaze At Vase Value. The red details were done in L'Oreal Devil Wears Red.

I used a nail art striper polish, Sinful Colors Bad Chick, to add the line details to the tribal pattern. I then had fun with my dotting tools. Dots were added in China Glaze Capacity to See Beyond, more Julep Lexie, more Devil Wears Red, and some more Peachy Keen.
Colors Used:
China Glaze Peachy Keen
Julep Lexie
OPI Amazon...Amazoff
Sally Hansen New Wave Blue
Essie Where's My Chauffeur
China Glaze At Vase Value
L'Oreal Devil Wears Red
Sinful Colors Bad Chick
China Glaze Capacity to See Beyond

Tuesday, May 27, 2014

Magnetic Memorial

 Time to play with some magnetic polish! I wanted to have fun with more Memorial Day nails, while also experimenting with magnets. I don't have any magnetic polish I would truly call 'red', but this reddish purple did the job fairly well! It rather reminds me of those 'country style' or 'rustic' more subdued color schemes.
 I began by using a base coat of China Glaze White on White. I knew I would be using tape, so I wanted to wait until it was as dry as possible. I then placed two pieces of striping tape side by side to make the stripe wider. Next, I painted over it with two coats of Sinful Colors Captivate Me. On the second coat, I used a magnet to apply a diagonal stripe effect. It still showed up well after the tape was removed! China Glaze Sparks Will Fly was used over the bottom fourth of the nail, and I used the same magnet to add more effect. The magnet was easy to align, and using the same one did make it seem more cohesive.
 I decided to leave my middle and ring nails as one solid coat of each magnetic polish. I absolutely adore Captivate Me. It reacts amazingly well to the magnet, and has a brilliant holo glitter that really shines in the darker patches. Sparks Will Fly doesn't show the magnetic pattern as crisply, but it had a wonderful formula.

Lastly, I did my thumbs as half-and-half of each magnetic polish split by a line of white. I had some metal star brads that weren't intended for nail art, but I cut off the spines and sanded the edges, and it worked perfectly!
Colors Used:
China Glaze White on White
Sinful Colors Captivate Me
China Glaze Sparks Will Fly

Tuesday, May 20, 2014

Swirly Blues

After swatching out Morgan Taylor Rhythm and Blues on Sunday, I really wanted to play with it more! This was the result of me just having fun with whatever came to mind, and  I love it!

 Since I already had Morgan Taylor Rhythm and Blues on my nails, I pulled out my striping tape and placed it haphazardly across each nail. Next, I painted over the nail with OPI Alpine Snow, then carefully removed the striping tape.
 I also wanted to test Rhythm and Blues as a stamping polish, so I used a swirly design from Pueen plate 46 to contrast with the lines from the striping tape. It worked wonderfully! As a little extra touch, I decided to tint sections blue using Sally Hansen Ice Tint from the Palm Beach Jellies collection. I actually think the tinty topcoats are rather fun!
Colors Used:
Morgan Taylor Rhythm and Blues
OPI Alpine Snow
Sally Hansen Ice Tint
Pueen 46

Sunday, May 4, 2014

Crossed Stripes

 Sorry for the long absence! Life got a little busier, so actually making the blog posts fell behind. I have a large backlog to catch up! I have a few more 31 day challenge nails to post, but I did finally have to cut the challenge short. Anywho! I had fun with stripes for this stripey theme. I originally was going to remove the striping tape, but I loved how the light copper looked on the dark green. I rarely leave it on, so it was fun to experiment!
 I started with two coats of Icing Emerald City, which is marked as a 'cashmere' polish. It dries to a suede-matte finish, and has a delightful blue-green shimmer.  (Side note: Eventually I'm just going to swatch my collection, and I really need to do the Icing polishes because I rarely find images of them online!)
 Next, I added striping tape in rows to my index and pinkie fingers. I then added one coat of Butter London Jack the Lad to those nails, then removed the striping tape. I did full coverage coats on my remaining nails. Next, I added the striping tape to each nail. I had to use a generous amount of topcoat to hold on the striping tape, but I love the effect!
Colors Used:
Icing Emerald City
Butter London Jack the Lad

Friday, March 14, 2014

Stripes and Spots and Sparkles!

 I picked up some of the new Milani glitters, and was really eager to play with them! So this was something fun and quick I put together to experiment. Had to try to catch that lovely holo sparkle in multiple types of lighting (and of course I missed out on daylight photos...)
 For my thumb, index, and pinkie fingers I put down two coats of Sally Hansen Nightwatch. Of course, it looks black in these photos, but it's a really deep navy in person. I then added two coats of Milani Sugar Coated. I love this glitter! Then again, I love most any matte glitter. This one is a mix of multiple sizes of smaller hex glitter, some itsy bitsy bars, and of course a generous scattering of intense holo glitter.
 For my middle and ring finger, I chose to use Sephora by OPI It's Totally Karma, which isn't too far off in color from the glitter. I then used striping tape to make a barred design, and filled it with more Nightwatch. To match the holo effect on the other nails, I added a touch of China Glaze Fairy Dust. The holo specks are a little smaller, but the idea is there.

Sadly, I did this too close to when I had to leave for work, so the polish hadn't set completely and I had some warping of the lines near my tips. Oh well, it didn't turn out too badly!
Colors Used:
Sally Hansen Nightwatch
 Milani Sugar Coated
  Sephora by OPI It's Totally Karma
China Glaze Fairy Dust

Sunday, February 23, 2014

Complementary Colors

 For this I decided to pair two polishes with the same bright foil finish. These turned out so flashy! It was a lot of fun.
 I started with a base of ORLY What's the Password?, which is a bright orange. I find that I love orange polish, but since I'm fond of cool tones I tend to use orange as an accent. I'll have to try the inverse sometime.
 Once that was dry, I used striping tape to block off the design on each nail, then added a coat of ORLY Sweet Peacock, which is one of my new favorite blues. The most impressive part of these polishes is that these photos were taken after three days of wear and they almost look as good as new!
Colors Used:
ORLY What's the Password?
 ORLY Sweet Peacock

Wednesday, December 25, 2013

O Christmas Tree

 I had originally intended to decorate these little trees with tons of ornaments using all sorts of nail gems. However, I ended up liking it so much nice and subdued, I scrapped the gaudy ornament idea completely. Plus, this actually stood up to a busy week of holiday antics!
 I started with two coats of Sally Hansen Go Gold. I am so in love with this polish. It's one of their new Satin Glam line, and it surpassed my expectations. It actually looks more champagne than gold once it dries to that semi-matte finish.
 The trees were done by taping off a triangle using striping tape, then filling that space in with Zoya Chita, which is a lovely green textured polish. I then painted on the garland using a small brush and more textured polish, Finger Paints Midas Touch and Icing Sand Dollar. I then added silver stars with a little nail glue.

Merry Christmas!
Colors Used:
Sally Hansen Go Gold
 Zoya Chita
 Finger Paints Midas Touch
Icing Sand Dollar

Wednesday, December 11, 2013

Candy Canes

 Candy cane stripes! This was a fun abuse of striping tape. I was rushing it a little bit, but I think it still came out okay.
 I began with two coats of Sinful Colors Snow Me White and allowed that to dry completely. Then, I applied strips of striping tape for the design. For the red I used Sinful Colors Sugar Sugar, which is still one of my favorite red polishes. For the green I used Sinful Colors Pine Away. It's such a perfect Christmas green!
  I started out coloring the red sections with the bottle brush and using a narrower brush for the thin green stripes, but that ended up looking inconsistent. I actually had better success wiping the green bottle brush in the bottle neck to narrow it, then using that narrower profile to paint in the thin stripe.
Colors Used:
Sinful Colors Snow Me White
 Sinful Colors Sugar Sugar
 Sinful Colors Pine Away
Related Posts Plugin for WordPress, Blogger...